So… You want to build your own hacking device…
Show original YouTube description
Show transcript [en]
All right, welcome back everyone. Good afternoon and welcome back to Bsides Las Vegas in the Common Ground. This is You Want to Build Your Own Hacking Device by Alex. And before we begin, I'd like to give a few announcements. We'd like to thank our sponsors, especially our diamond sponsors, Adobe and Iikido, and our gold sponsors, Drop Zone AI and Profit, as their support along with our other sponsors, donors, and volunteers that make this event possible. These talks are being streamed live to YouTube and as a courtesy to our speakers and the audience, we ask that you check to make sure that your cell phones are set to silent. If there is time at the end
of the talk, there will be time for audience questions and I will pass the mic around to anybody who wants to ask. And as part of the cell phone policy, there is no photography allowed. But with that, I think we'll pass it off to Alex. Let's give him a warm welcome. [applause] Uh, hi. Awesome. Can you hear me? My name is Alex. As you just mentioned, uh, this talk is going to be on how to create your own hacking device. So, just a brief rundown of how the talk is going to go. I'll introduce myself. Why are we why am I giving this talk? There's a little bit of background information for it. And then first part
is essentially the components of how you actually select what you want. And then after you get the components and you have a general idea of the different things that you might want to do, we have some project workflows. So that way you can see kind of what the price points is for some of these things along with some applications and some of the devices I've actually built using the more or less methodology that we show. So to start it off with uh again name's Alex Lines. I work with Precient Security where I'm a senior penetration tester. Uh, in short, if it's on port 443, I usually test it and it's been a lot of fun. I've worked as both a
defensive and offensive consultant. I have way too many certifications. Uh, please don't do that yourselves unless you decide you want to waste a lot of money. Uh, but I have 23 right now. Uh, and probably going to be more by the end of the year. I love programming. That's part of the reason why I started giving this talk. Uh my languages that I really prefer are Python, Golang, and JavaScript. And then because of video game hacking and other things that I've been doing, I've been getting better at C++, C and Java. I have a fixation every month slashquarter. So this quarter was more hardware stuff. And also I do a lot of uh video game playing which actually
really helps with different talk ideas. So, why in my opinion I think y'all might be here. Well, making your own stuff is a lot of fun. Uh, does anyone here know what a flipper zero is? Lot of people. All right. So, that flipper zero is really awesome, but it's $200 more or less. And I like to put stuff on drones. As much fun as it is to put a $200 device on a drone, I don't want to fly that device into a building and then break not only my drone, which is like $200, but also that flipper zero. I have no problem launching a drone 100 miles hour into a building and breaking a $5 piece of equipment. That's
perfectly fine. I'm not crying over that. And also another reason for this talk, IoT devices are life. There's IoT devices around us everywhere. And the more you get an understanding of how they're made and how you can make your own, your life gets a lot cooler in my opinion. You can go and make different devices. Like for example, if you want to be off-grid, you can use Meshtastic. If you want to have a homemade present sensor that isn't sending stuff to the cloud, awesome. You can use different pres sensing devices. So, there's a lot of different things you can do if you learn how to make it yourself. Lastly, uh last year there was actually
a talk that I gave at Sky Talks and different other talks where I made a drone that could act as a mobile hacking platform where we would actually fly the drone in somewhere, land it, drop off a device, and it would act more or less like an evil twin where it would go and try to get people to type in their credentials to a portal that looked the exact same as the Wi-Fi except they added underscore Wi-Fi extender or something of That means get them to type in their password and now all of a sudden you can connect to their network. A couple caveats with ex uh 802.x if I'm not 802.1.x but for the general purposes that's a
way to get Wi-Fi passwords that are a lot more secure and it's a little bit easier than trying to crack it with like hashcat or air cracken g. So, just a general overview for those who don't know what a um flipper zero is. It is this device right here. It is a pretty much a Swiss Army knife of different attacks that you can do. Whether it be radio frequency, uh if you put an extender board on it, you can do Wi-Fi attacks. There's RFID. There's almost no limit to what you can do with this thing because it has GPIO pins up there. It's also supported by a pretty decently sized community. So because of that, you can have a lot more
functionality added to these devices because other people are working on them. But again, $160 USD other places in the world, that is way more money than anyone will probably want to spend on a device like this. Another tool that I really liked that actually inspired a lot of stuff is the Wii U Wi-Fi or USB Nugget. Uh, so this device, it looks like a tommoagi in a way and it's like a little cat and it's super cute. Uh, and it does Wi-Fi attacks and there's different ways because it uses an ESP32 or an ESP 8266. They have different pros and cons with them, but in short, it's this device that, you know, you can get
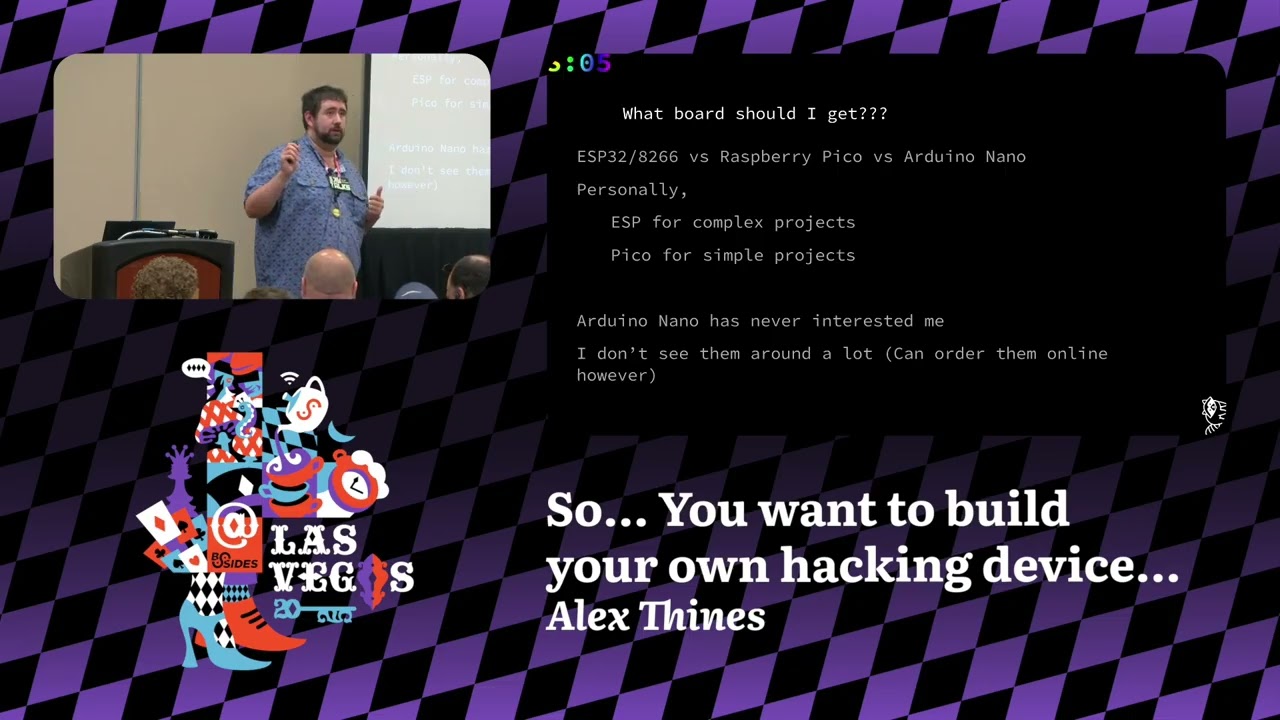
through TSA and they're not going to be like, why do you have a hacking device on you? They're just going to see some pink or purple toy and they're like, I really couldn't care less about this. and go on through. But actually a good note thing to note about this does not have GPIO opens exposed as far as I'm aware of. Later models might, but they are not as robust as the flippers. So you can't expand it nearly as much, but at the same time it is a lot cheaper. So let's get a little bit more into actually making these devices. So, one of the first things you need to decide when you're trying to make your own
little hacking device is what board are you going to use? For example, for me, I love using ESP32s and ESPs 8266. They have a lot of pros with them. One of which is, relatively speaking, they're kind of cheap on Amazon. $16. You can get three of them. It changes, but essentially, you can just go and get them for a rather decent price. Uh, I have a micro center in Dallas, so they they're a little bit more expensive there, but at the end of the day, it's not groundbreaking at the price. Their power needed is 5 volts, which is very important to know if you're using a different power bank to actually provide power. Sometimes they don't provide 5
volts. Sometimes they're 3.3 volts or the throughput of the power is not enough. So knowing the power requirements can be super important not only here but in later when you're actually using different devices with it. Um my favorite part about them is ESPs usually have Wi-Fi and Bluetooth capability by default. That means for most of your functionality that you're doing you have the tools. I like to use the Wi-Fi a lot more than I do Bluetooth admittedly but you still have that Bluetooth option. Raspberry Picos Picos are really cool too. They're cheaper usually. However, you have to then worry about wireless functionality. And that's mostly just Wi-Fi. You don't even really get Bluetooth unless you add another
device onto it. So, if you want to be cheaper, a little bit leaner, yeah, you can use the Pico. It is definitely not terrible. The power requirements are also lower. They only need 3.3 volts. That may not sound like it's a huge difference, but when you're plugging in components and powering stuff and you don't have a solar battery or a way to recharge it, it definitely comes in handy for the longevity of the device. I like to buy them from MicroEnter. They're cheaper than they are on Amazon when I looked it up. The last one that I don't have that much experience with to be completely transparent because I'm not a fan of them is the Arduino Nanos.
They're 5 volts, so they have the same power requirements that the ESPs do. However, they don't have wireless functionality. You have to add everything to it. That is cool. That is nice, but sometimes I like to be lazy and just have all the functionality ready for me. And the nanos are not exactly the best thing for that. But it is an option if you don't want to use the other ones for whatever reason. So again, what project or which board should you get? In my opinion, there's a really easy way of looking at this. If you want to make something simple, let's say I want a device that I can put by the door, it shoots a laser and then
once something breaks that laser, it sends a message to my server saying, "Hey, someone is here." Awesome. You can just use a Pico. That's very simple. It's not complex. You can just get a wire or a wireless one. Very simple requirements. You just have to make sure that the sensor can be powered with 3.3 volts. If you want something a little bit more complex, uh like for example a talk I gave yesterday where you want your device to be using a mmwave sensor to then grab the data, take the data, parse it, then send that data to an LED ring and then to a web server to do something similar to wall hacks. uh you might want ESP for that
because that's a lot of different components I just listed off and it needs a little bit more memory. It needs a little bit more power to do all of those features. Uh again, the Nano I've I've never seen many I have not seen many people use them. They seem cool, but again, you have to go and buy extra peripherals, which means you have to worry about more energy consumption, compatibility, and more things to debug that when I'm making stuff. I don't think more debugging is ever really the answer. So, I have listed off three devices here, and I'm sure many of you all know that there are a lot more than those three devices. There's Raspberry Pies,
there's Pi Zero, Zema boards, Uno boards. Why have I not mentioned those? So the reason for that is mainly because those boards are in many ways in of themselves their own little computers. They're ARM devices. So you can load like Kali Linux on them, Ubuntu, I believe, Arch as well. So you can load them and they're their own operating systems. They're not very small in size for that. So, I didn't necessarily want to use any of those boards in my talks just because at the time I was putting this on a drone and the drone had a weight capacity of around 100 g. To power the Raspberry Pi itself is a little bit heavy, believe it or
not. But the real issue becomes in powering it with a power bank. Power banks are heavy and if you only have 100 grams to spare to have decent performance on a drone, you're not going to want to use that. Versus a lipo cell battery, super easy. They're super light and you can get one depending on what your use cases are for it. Um, that being said though, Pi, zeros, zemo boards and all that, those do serve a purpose. I think you should definitely look into those, especially if you need what I've used of them as is more like a processing server. For example, the ESP, you're not going to use AI on that. You're not going to use computer vision
on that. You're not going to load up a UDP web server and an HTTP web server. You're you're not doing that. But on the values, you can very easily. They actually have great performance for that. And then also soldering. You don't have to do that on a Raspberry Pi. On these other devices, sometimes you do. So, another thing that you need to decide once you figure out what board is best for you is the language that you're going to use. I love Python just mainly because I like to have an easy life. Uh, Python also comes in another variant. There's Circuit Python and MicroPython. You can use those languages. If you already know Python, congratulations.
You know 99% of MicroPython. The only difference is getting the libraries on the board is different and they don't have all the same libraries just because it's a smaller board. So, they have to be a lot more lean about it, but and also the PIP uh is different. It's very different and you have to figure that one out, but it's not that bad and honestly is a great starting point. Then if you want to get a little bit more advanced, there's Arduino which is essentially like C that is way stronger and it has a lot more features and a lot more capabilities than MicroPython does usually. Um that is definitely something to consider, but there are a lot of pros
and cons with it. Uh the big ones for me at least is for micro python I can just tell it hey go into your own codebase go into your file system and rewrite this main.py so that that way your functionality can change. That is super nice, super easy to do and it does not require any advanced infrastructure. It's quite literally just making your Python program rewrite itself. Arduino not the same. you actually have to do uh some flashing over the air and that is a little bit more complex and if I don't want my things to break while I'm rewriting them because they're let's say 500 meters away I don't want to have something that's a little bit less
reliable for me versus Python I can just make three different use cases of like hey if you fail go back to this go back to this so that way I always have it constantly running something versus a compiled language I have to hope for the So another important thing to consider is the boards themselves. So easiest way of looking at this, you have three different boards. They have very different use cases that we'll go over in a second, but a good thing to know is what they actually do. I'm sure most of y'all are familiar with breadboards. They're super cheap. They come in a lot of really cute colors, and you don't have to solder with them.
Usually you have female to head or female to male different wires and you can just plug everything in and you don't have to worry about the fact that oh I have to solder and if I solder and I make a mistake then I have to go and desolder everything and it makes a huge mess or bridging connections which can be very difficult if you're new. So I like breadboards for very rapid uh proof of concept devices. Another thing with it they are again cheap as I love that. Uh, but the really big issues with it is first off, you're just plugging it into the little holes. They are not secure. If you smack it or if you move
the devices too much, they will just get unplugged and then you have to go through and rewire everything. Not fun. Another thing is they're bulky. Uh, my desk is filled with them and you can't even see the desk anymore because it's just covered by breadboard wires and components. So, a way to go a little bit more advanced once you're out of the very rapid um portion is you can use the PF board. Perf boards are a little bit nicer. You do have to solder. So, there is that skill uh part that you have to work on, but it is soldered. It is probably not going anywhere unless you break the component or the wire, which
is really nice because at this point you can put it on something. You can make it more mobile. It doesn't need an enclosure like a case. So, you can put it on a drone, fly the drone 100 miles an hour, and you're not worrying about that, which is really awesome because again, I don't want to break $200 devices. They're still cheaper. They have different colors. Some of them have it so that they are quite literally independent where you have to bridge connections. One that I'll show in the next slide, you actually can have it so that they're bridged for you already. Kind of like the breadboard configuration, which is really, really nice. I actually recommend those more.
Last is the fabricated board. This requires the most planning. It is the nicest looking board by far, but you can't get it like today. You have to wait a little bit and depending on which service you use, you know, it can take a couple times. If you really want to figure out which uh fabricate or which company to use, honestly, go on to YouTube, type in board and IoT devices. You're going to get 15 people pop up and they're all going to be sponsored by the bread makers, the PCB makers, and it's awesome. You can pick your favorite one and go with it. They can do different colors, different designs, and some actually put the boards together. So, it
is a very nice option. They are a bit more expensive than just the breadboards and the perforated boards, but if you're trying to actually make this device and sell it, that is definitely what you want to go. This is actually the board for the USB and Wi-Fi Nugget. So, as you can see, this board looks way better than these two and these two, uh, just off the rip. So, lastly, the board that I was talking about, uh, I would recommend these for everything that you're actually doing where you want it to move. The main reason for that is because these connections are bridged and you don't have to do that manual bridging yourself because it is unbelievably annoying and
it is a great way to destroy your components if you don't keep track of where the 5volt power is and the receiver. Ask me how I found out about that. Or if you don't want to see smoke. If you do want to see smoke like a little poof and it smells like toast, uh, then bridge your own connections and just have fun figuring out which one it is. Just know if you smell the smoke of doom, that component is now fried. But it doesn't smell that bad, honestly. So again, why would you pick one of these boards over the other? Breadboard, early stage of development. You want quick proof of concepts to prove that what you're saying isn't
completely unbelievable and it's temporary. Like you're not going to be using components. You're not going to be heating up the components and it's really nice. Uh if you're doing something really fast when you have a little bit more of an idea of what you're doing and now you're just refining it or you're wanting to make it mobile. Perforated boards, they're great. They're more secure. You're going to, you know, you can still do it rapidly. It's just you have to solder it, make sure the connections are good. And that is going to be super helpful again when you want to like show your boss, hey, I made this device. It's going to help us on our red team so we
can track the person in the security guard of room. It's really helpful. Oh, I touched it. Awesome. Uh the last one is the uh the actual developed board. So that one's really nice because again everything is secure. It's going to look the best. And sometimes again you can get these with the pieces already assembled depending on the pieces. Very polished. And if you want to actually sell these devices, this is probably the route that you want to go. So going through this now, we now have an understanding of what board do we want to get? Uh what we want to put it on and what language you want to program in. Now what? Now you get to ask
yourself the really fun questions. What do I want to do with this device? For example, do I want a trip sensor that will be watching a door? So that way if someone goes through it, I get alerted on it. Awesome. I now get to make the choice sonar or LAR. And then after that, do I want it to report somewhere else like to a web server? Awesome. I need something that can do Wi-Fi capability, Bluetooth capability, meshtastic, really just some kind of outbound communications. So that's a simple idea. Another one is if you want it to do something like, you know, it trips a wire, then it makes an alarm. Awesome. Now you need a component that
can make the sound. So really at this point it is up to your imagination how you want it to work whether it's you want it to be local remote something that you interact with you have to just figure out what you want and you can then just start doing stuff which is something I recommend just buying components uh and just experimenting. You never know uh what you don't know and then once you once you start finding out you don't know this stuff then you can start googling it. You can start doing research on how to actually make these different things work together or you can cheat and I don't recommend this that much but you can use chat GBT to
help you out 50/50. Sometimes it gives good advice, sometimes it hallucinates and you are now doing some random project and you're going to fry all your components. Very unfortunate for those. So for getting the components, there's two options that you can really do. The first one is if you know specifically what you want, you can go to Amazon, Sparkfruit, Adafruit, and get the individual components. It is cheaper that way because you getting specifically what you want. But if you're a beginner and you're just trying it out, I actually wouldn't recommend that. I would recommend buying a stem or project starter kit. Uh Eligu is someone that's on Amazon a lot. They have a bunch of different components, bunch of
different price points. So for that you can actually go buy a kit and figure out what you want. And the best part is they actually include documentation usually which is something that's very important for parts and it actually assists you in the programming process just because if you have a sensor and you don't understand um how it works and you need to get example code. If you only have example code in C, you're going to have a really hard time programming that in MicroPython because the two languages are not the same and they're going to use different libraries. But Alglue, they tend to have every single instruction and both in multiple languages. So that way you don't really
have to pick. Another option again microenter love them so much. Uh they have something called inland where they do very similar things and if you have one by you, you can just go and pick it up. So again, things to consider when you're actually selecting the parts, whether it be buying the parts individually or going to get the kit. What documentation documentation exists? If there's documentation again in C, but not micro Python, congratulations. If you want to program in MicroPython, you probably cannot use that component or you have to reverse engineer how it works and recreate it in Python. Not impossible, but it is kind of annoying. Is the product end of life? actually had this
issue with a gyroscope. I was using a model from four years ago and the documentation was not all that great. I tried to buy it. I got it. It wasn't working very well. Then I did a little bit more research that I should have done. Found out, oh no, there's a newer model. The flaws with the gyroscope stopped working or were fixed and the documentation's better. Price of time versus arrival. This is a big one for me. I am fairly impatient when it comes to buying stuff. I kind of want it yesterday. So, if you go to MicroEnter, if you have one near you, you can get it today or you have to wait for Amazon or
some other third party service to go get it and then ship it. Sometimes it takes forever or you can get it from AliExpress. Again, cheaper on AliExpress, just you have to wait a very long time. Amazon less time. Micro Center probably the least amount. And then the last part that's really important is powering the components. So for a Raspberry or sorry the Pico device that was 3.7 volts. If you have a device that needs more than 3.7 volts, unfortunately you're going to have to do something to either step up the voltage or use a a separate power source for that device. And it kind of sucks. Uh if you're using a 5volt and it needs 5 volts, awesome.
The ESP32 is just going to run it. You just have to make sure that you have enough power supplied to the system to actually make the device work. So, this has been super fun and I'm sure all of you enjoy the lovely little slide presentation of all theoretical stuff. So, let's actually make something because that's a little bit more fun. So for examp what I first device I made is I was playing World of Warcraft and for whatever reason my internet decided to drop every 5 seconds. I didn't know why it was happening but drop for 5 seconds and then come back. If any of y'all played World of Warcraft, you know it can do 5 seconds and it's a little bit
sketchy. But when it goes up to 20 30 seconds, you lose connection and it is not fun during a raid where a DPS all of a sudden has no connection and gets kicked. So I thought I was going insane. So I made a little device that would check my internet connection and then if I did lose internet, I got a little blue light saying, "Hey, you are not going insane. You legitimately do not have internet." And then it turned off the light when I regained internet so that way I could actually, you know, track it. And then eventually I added more stuff. Like for example, I wanted it portable. So that way if a network
technician came over, we'd be able to do something about it. Easy way to spot it because again, a very bright blue light is a lot easier than a little screen saying, "Hey, you have internet. You don't have internet." Loggs. Uh because I was a blue team analyst, I love logs more than anything. And logs need timestamps. So what do you need? So I for me I like the ESP32. It has network capability so I can connect to my internet then ping Google. MicroPython again super easy. A breadboard SSD 306 screen and uh some wires. Essentially this device did not need to really go anywhere special. So I could just use the temporary stuff. Big thing to note, the device cost me per
unit about $18 in total for all the components $78. So it is relatively cheap per unit and then I have components to make other projects as well. So uh for programming, what I love to do is break down every individual component to its little piece. So that way it's not some giant project. It's something small that's easy to look at. So what I want my wants translated into actionable items are I need something that can connect wirelessly. Check if I have a connection. See the status and then go through two and three just looping to check do I have connection? Yes. Cool. Let's wait. I don't have connection. Cool. Check a little bit faster. The
lights make it easy to transport external batteries or power source and a screen so that that way I can see remotely and I don't have to be connected to a terminal on my computer. LEDs again bright blue light flashing saying hey I'm on is really helpful. Getting trying to get the current time it's just connecting to you know an NTP server and then updating its internal server so it knows what time it is and then print the information to a serial port. That was super helpful, but when it was moving, not as much because now I lost the terminal connection to see it printing out. But I had other stuff so that way it compensated.
So here's what it looks like or proving that it's possible. Connecting to Wi-Fi. Hey, I'm connected to Wi-Fi. Here's my IP address. Subnet mask. Uh what was it? That one is default gateway. And then that is a DNS server if I'm not mistaken. Checking. Awesome. I have connectivity. It was 1:38 in the morning. One of my packets made it. I live. Uh, one of the things I do want to shout out to is this person uh Sean. They made ping functionality for uh Python, which is amazing because apparently Python you can't ping something by default, which I didn't know. And then painting the screen. So, this will update if I have internet or not. And then error handling. There's a
ton of error handling that is helpful. For example, you can't get your NTP server for whatever reason. Your Wi-Fi isn't as fast or you're too far. It's helpful to make little steps to go step by step on how to actually make sure everything works correctly. Then here's what the prototypes actually look like. No bright blue light, so it could connect. Bright blue light, it can't connect. Uh, in short, uh, there's where the software is located because, uh, in case any of y'all have issues and you would like to see an example, there it is. So, upgrades, how could we make that better? For example, I could use a better board. Uh, for example, I use an ESP32. I used the breadboard. I
could use a PF board and I can make it a lot more presentable. I could have 3D printed a case so that way it didn't look quite as ugly as that, but I didn't really need to. But I could use actual le uh LEDs instead of the onboard. Send it to SIS log on UDP 514. Make it configurable remotely. There's a bunch of little things that you can do that I highly encourage when you're making a device. It's awesome that you made it work. How can you make it better? If you try to constantly improve your stuff, that's how you get better. just make it do something stupid that no one else really cares about, but you get to learn
a new technology in the process. And that's how you can grow and grow and make more advanced projects. So, I'm going to show youall the next device. This was the device that was used for the hacking drone. I would highly recommend first off, you're going to get context for where I uh came up with this idea. Please don't copy that. uh the FAA will not be happy with you and you're going to be in a met you're usually in a metal tube with uh flight attendants there. So don't copy that. So, let's say I wanted to make a device that would clone Wi-Fi and then after I clone the Wi-Fi, set up an access point
to try and get from credentials so that that way I can connect to a password protected Wi-Fi without actually knowing the credentials and having to do more advanced attacks. Well, simple ways of doing it. What do I want? Clone Wi-Fi. I need to get someone to submit a password to me. That makes sense. And I want to grab those credentials remotely. If I am, let's say here I and I have a device planted in a literal plan. I don't want to go over there to grab my device to check if I have information and I don't want it remotely visible because safety ops is going to be a little bit concerned like, hey, why is
he obsessed with that plant? What's in that plant? Why is that plant all of a sudden glowing blue? It should not be glowing blue. So something remote is a little bit more helpful. Then again, I'd like it to automatically check passwords. I don't want it to just grab all of them. That being said, I do want to know if it submitted it correctly. And then I want to know all the passwords submitted in case we had a user that's like, hey, I'm going to type in my Active Directory credentials. Okay, that didn't work. I'm going to type in my JR credentials because they're not tied together. and they could go down through a bunch of
their credentials and now congratulations, you have compromised a little bit of their network just because they couldn't connect to a Wi-Fi. So the prices notice that is the exact same. So it is helpful when you're making stuff. Think about how you can use it for other use cases. It is definitely going to make that $77 go a lot further. So, breaking down the idea, let's make it something a little bit more tangible because it doesn't sound super tangible at first. Well, I need to set up a wireless access point. I need a web page. I need to get a captive portal. That isn't necessarily the easiest thing in the world unless you find the right
libraries. So, it's something that you have to research. And then adding an obscure endpoint to read the information. Um, that's going to be super helpful, especially I doubt anyone will do it, but if someone's running Durbuster or Gobuster against your web server to see if they can find endpoints, you want to make sure it's not going to show up there just for security sake and opsect safe because if all of a sudden this access point, you go to a really random URL or you and then you see a bunch of passwords, your IT department or their IT department is going to get upset. They're like, "All right, what are these? Are these valid? We have a thread actor around us who is
now doing physical attacks against our infrastructure. Then lastly, uh again, I wanted to check the passwords. So I need to go from an access point to a client. I need to have LEDs. Sometimes you like LEDs, sometimes you don't. And then I also need to save all this data to a form so that way I can recover it later and see if I need to make a password list from it. So proving it's possible. Uh y'all, if any of y'all play League of Legends, you're gonna notice some interesting comments from here. So, for the once, all right, how do I set up a Wi-Fi access point? Setting it up, loading HTML, routing DNS traffic. So, uh in case you
don't know, when an Apple device or an Android device connects to a network, they tend to go to two different web pages. So, you have to capture both. And then the other issue is if you are connecting and it has the wrong host name, you have to have a DNS server that will actually reroute it to the correct host name or the correct IP address. So you can do a catchall and that will make sure that they're all redirected to the same place. Then setting it up so that you can see it. Uh for example, run it down mid lane. That is not going to be in a password list. That's going to be in
someone else's list. But most people don't think run it down mid lane and then it can go it reads the file and it presents it. If it doesn't work, it just throws a 500 error. So that way you can be more aware of that prototypes. I didn't have a banana, but I did have a muffin and an orange. So again, the device very small. You can plant that somewhere and you can't you can barely see it, but on the other side of there, it actually has the battery included. So that that way you can plug it in, drop it somewhere, whether it be manually or with a drone and it works. Screen optional at this point because
again you want to look at it remotely. You don't want to look at it in your hand. Software breakdown is what we're going to do next. Going over the individual components of it. So lot of text, lot of text. Uh this is going to be honestly all on my GitHub anyways. So y'all don't need to copy or like try to memorize all this code. It's publicly available. So iOS goes for hotspot detected. Wrong host is just if I'm running on 192.16825 and you're going to local host for whatever reason, it's going to say, "Hey, wrong IP address. Go here instead." uh re+ uh that just says, "Hey, I need to restart the server because something happened and I need a
factory reset." Super helpful to have those because you never know if something breaks and you definitely want that catch all making sure that it's going to the right host. Apparently, in this case, it's 4.1. And then just a bunch of different reds to help you make sure that you're actually connecting to the right place. All right, the the fun part is the index. When you land on the page, it just depends on where you're landing. Uh, for this instance, I don't think I actually have the access point that I was using just because it was American Airlines inflight entertainment Wi-Fi and I presented this to some college students, so I didn't want to give them
ideas there. But the general idea is it serves a page that is checking to see, hey, have I been pawned or have they been poned? No. Cool. Show them the captive portal that makes it look like, you know, whatever the company's login page might look like and then change the verbiage. That way it says, "Hey, give me your Wi-Fi credentials and I'll connect you straight to the Wi-Fi because you're really far out and you have shitty signal." Then if it does work and they are in fact giving me credentials, it will send a page that pretty much says uh congratulations, you got got because it's a little bit funny to let someone know that they've
actually been hacked. Uh in reality, it shows it too fast and it just redirects it, but you can make it so they can't see it. Checking credentials. This is a fun part. So for credential checking and wireless access points, you can usually only either only be in an access point mode or in a s or in a client mode. So a way to get around that is this function right here. It will actually time out for 15 seconds in JavaScript. 15 seconds is usually in my testing long enough to throw down the access point, access the client, go type in credentials, wait for them to give you an error message, and come back with the results, which is
definitely something that's helpful for this because you don't want to have them waiting forever. And this is what's shown so that that way they're not getting frustrated. And that is a thread trying to actually do it back into the code. So this is how it's actually transitioning and doing it. So as you can see here, hey, turn off my access point. Turn off the client mode or turn on the client mode. Connect. Awesome. It's able to connect. I got an IP address. And we can return that this was successful. Lastly, grabbing the credentials, it is saved here. Run it down mid. If you go to that URL instead of login, you will get to see a text file of everything
that was tried. So, as before, how can we make this better? Again, the standard ones for me, you can make a better case. The board can be nicer looking. Uh, this one had a was a straightrough connection with the lipo cell battery to the power. You can give it a recharging capability. Uh, the device you can have it upgrade itself. So, for now, it just says, "Hey, I have Wi-Fi access. That's awesome." And stops. But you can have it then go to let's say GitHub, go to a repository that only it really knows and say hey download this Python code and now we can do more advanced attacks. We can run end mapap or we can try to do some light responder
work. After that you can have it beacon itself. I actually use uh want to use that for an engagement for a test soon. Uh so that that way I know I can just go and grab it. One of my things that it can do that was actually why we used MicroPython is that you can actually set the BSID or BSSID and the SSID manually. So that that way if you have the BSS ID, the SSID, the security level and then finally the password, you can actually pull off the evil twin attack and it will make the devices connect to it instead of the actual access point if it discovers it first. There's a little bit
more annoying caveats with it, but I was able to get my work computer with that. And then lastly, you can upgrade the hardware. I like to use ESP32, but if you want more advanced tool sets, zerow y or pi 4 and a pi 5. So, with those two projects, those were very use case specific for me. What about y'all? Some just random ideas. A Wi-Fi access point scanner. So that that way you can see all access points around you and get a better understanding of how they're working. You can actually use a finder. So um it's really fun. When you look at a Wi-Fi, there's usually a signal strength. You can play hot and cold with
that signal strength in your device and it will more or less lead you. It's like, hey, signal is getting stronger. Cool. You're getting hotter, hotter, hotter. Move the wrong way. Colder, you're moving further away. Enterprise link sprinters. Those things cost $400 to connect it to a Wi-Fi to a Ethernet cable and then get see if you can get an IP address, DNS and DHS or DHCP. You can make one of those and it's not $400. I promise you that. Uh you can do a wireless version where you just connect it to the Wi-Fi, get information helpful for network technicians. a Discord or Slack notifier so that that way again someone walks through the door I get a Discord message saying hey
someone walked into room F can be super helpful for monitoring hardware password managers uh it's not secure would not recommend this necessarily but if you're lazy you can have it load all of your passwords then change it to say hey I'm a keyboard when you plug it into a device click uh accept and it'll type in your password for you Not secure in the slightest, but if you're lazy enough, it is a method. And then I like a mini picture frame to like show pictures. You can make your own and you don't have to spend a lot of money on that. Again, where you can get some of the boards are some of the parts. ESP32 dev
board, starter kit, ultimate kit, relatively ship fasting if you do it on Amazon. Uh again summary why I think it matters. You know some of these projects not super helpful for everyone and you want to do more advanced topics. Well to get there you have to start somewhere. And for me when I was trying to make devices I was just overwhelmed with the options. So I wanted a way to have it so that way I would have very short like ideas of what I needed to do. And since I had short ideas or shorter list of options, I could actually spend more time making it versus not making it and just freaking out. Uh inspections again,
Flipper Zero, take that through TSA nowadays. You might get someone who knows what it is and they treat it as a weapon and they seize it. 160 to $200 device getting seized by TSA is not fun. Size and purpose requirements. Putting it on a drone, you need something smaller. And then lastly, there's other things you can do with this. Autobands communications again meshtastic great option for that. You can make your own lura devices. War droning, war driving, war RC caring, driving a little RC car around. You can get information and it's a lot easier. And then spoofing. You can spoof different uh Wi-Fi addresses and just have fun pretending to be anyone you want. So, got through the last part
very quickly. Uh does anyone have any questions? I think I'm >> Yeah, my hand to the mic over here. >> In my personal projects, I have found that many times I need to to fire figure out a way to handle the device or or just to configure it >> in a way that uh to make it do something different or something like that. So for most of the the solutions I found that adding a screen and maybe some buttons it's it's a great way to go and some for other project I found out that Bluetooth for example Bluetooth energy and building an app it's a right solution. So where would you draw the line where
it's better to just go with Bluetooth and when it's better to go with just a screen and buttons? So for me personally, I I have a laziness factor of which one is going if I'm trying to interact with the device, how much effort do I want to put into like select A, select B, C when I'm doing the buttons and screens, unless it's like something preconfigured and there's like few options. I'll do that. That's what I've used before. for Bluetooth. If I need something more complicated like typing in a full string or a full password, Bluetooth all the way because I can connect it to my computer, my uh my phone, and I can just quickly type it
in and I don't have to go A C D FY, >> huh? >> Energy. So, it is going to be a little bit more with the Bluetooth, but then at that point, you just get a bigger battery in my opinion versus the screen. It still takes up energy and it is something to consider. But at that point, you can just get a bigger battery, recharge it or don't don't use it as long. No. Uh, okay. Oh, just one more question. >> If you'all want to connect or have additional questions that I can't get to, please feel free to connect. Is there a specific IDE that you use? Does it depend on the board? So for
microython un I hate it. Uh there's something called thorny >> and thorny allows you to very quickly edit the code, upload the code and download the code and it handles a lot of the package management which is super important and very annoying to deal with but thorny definitely helps for microython. Thank you. No problem. All right, let's hear it for Alex. Thank you.
Related talks
 31:35
31:35 26:05
26:05 30:07
30:07 42:47
42:47 40:32
40:32 23:31
23:31