Return Of The Robots - Mark Goodwin
Show transcript [en]
hello everyone I'm Mark um so my day job is computer security hence the sort of bsides interest but I like playing with robots as well and so because events like this are kind of weird and you can go kind of off piece I thought well let's do that and it worked really well last year so I thought I'll do it again but this time I thought what I'd do is bring stuff so that you can have a go yourselves right so um when we get to the workshopy bit and we don't have to be too strict over the separation between what's talk and what's Workshop in fact uh Sam called it sort of a talk shop I think she wanted a
bit of both and what I've done is I brought some stuff so here is some things and here are some more things and here are some things and even more things but most importantly I've brought actual devices you can play with how many are we here s enough for most of you to have a one of these who's got a laptop out of Interest with them does the laptop have a USB port can do it can do okay um so yeah you can plug stuff in and have a play and if when You' finished you want to take one of these away with you I've got enough for most of you and a tener gets you one of these and a prototype
and board um but first I'll sort of introduce what I'm talking about um I started playing with computers when I was quite little my dad was a science teacher and in the 1980s if you were a teacher you got um a subsidized uh BBC microm computer that you could learn to program on the idea being that if you learn how to use the computer you could teach your pupils at school how to use the computer and then all of a sudden um eventually all of the people in the UK would soon get digital skills and the plan didn't work brilliantly because most teachers didn't learn how to use them but it worked all right for me um
and uh there there was something really exciting about that first computer I had um by today's standard it was absolutely pathetic it had um uh an 8bit CPU a 6502 CPU it had 32k of ram I was really lucky because we had a disc drive and a color monitor so this was amazing and um sorry I'm repeating myself from last year I'm really conscious of this now um one thing I've noticed is as the years have gone by and the computers that I use get better and better and better they're not as fun and I'm like you know why is that why is it that um the machines I'm playing with now just don't have the
same excitement as these first ones that are used and I think there are two reasons right the first reason is that we get really really um accustomed to the technology that's around us right I've got a really bad car at the moment we bought it cuz my oldest son is learning to drive and it's got more powerful computers in almost every part of it than the computer I learn to program on the brakes have got computers the engine's got a computer the incire entertainment it's got loads of computers and it's like a hatchback that my kids learning to drive in and my phone is a powerful computer it's you know several times more powerful than
the computer that sents the Apollo missions to space and everywhere we go we've got computers so that's the first thing we get really really used to them the second thing and this is a bigger problem is that the computers we've got today are really hard to play with right if you want to actually do something with a machine you've got to well first of all figure out how yeah and then you've got to go and find some sdks or programming tools you've got to install them you've got to figure out how to use them whereas when I had the BBC micro computer at home turn it on and it Go Bo Boop and then it' say on the screen BBC
micro computer 32k and I could start type in code there the actual operating system command line was a basic um RL environment you can write literally programming commands there and they work straight away you don't get any more accessible than that right and you know sure some of it was inconvenient like if I wanted to save my work and we were lucky like I said we had a dis drive you might have to use a tape you know put a cassette in the machine and blah blah blah but the point was from turning the machine on how to play with it was right in the front of you and we've lost that right but something's happened over the
past few years which is that the sorts of machines that are really easy to play with have become much more accessible okay so who's played with the Raspberry Pi before sh hands okay um here's a Raspberry Pi this is a Raspberry Pi I 3 I think I've got an Ethernet power over Ethernet shield so I can power it from an ethernet port which is cool this is a r z these are tiny and quite cool um on this thing here that blue thing is nardino okay and then what we're going to be playing with today are a different sort which are the pi Picos it's a um Raspberry Pi 2040 Arm based microcontroller thing um and the best
thing about these is that the prices have got ridiculously cheap um when I first started playing with arduinos they cost about 30 quid each um Raspberry Pi's the first ones were um sort of20 pish the zero is a bit cheaper but the Pico you can get the uh the basic version for about a f which you know for having a play with a computer that you can um really easily do stuff with is quite exciting so that's the why we we're going to try and sort of rekindle some of the the sort of immediate wow factor of playing with a computer um and then there's another aspect to it as well which is that um we want these
computers to do things right so um what's a robot maybe you tell me what they think a robot is does stuff like yeah yeah it's computer that does stuff like generally we use it to be to mean like a um a computer that um interacts with it environment in a non-specialized way right so you know you might have a robot on the production line and it might be able to do a bunch of different stuff um but like you know when when you're being sort of Fairly loose with your definitions a robot could be um something like the thing on a production line in a factory or it could be like your washing machine because that's a
computer that does physical stuff with its environment right um or your printer I guess but the more general purpose it is the more roboty it is when we talk about it I suppose um and I've built a load of these things um some of the first things I built were um really really simple um I was quite into making little remote control toy type things like this um I made a doorbell that when you press the button it took a photo this was before the whole sort of uh um creepy doorbell proliferation so when I made mine it was more a comment on the sort of banality stuff that people put on social media so
you press a button and it would send me a tweet that said dingdong and put a picture of the person at my doorbell right um uh a lot less creepier than a ring doorbell in the um you know it wasn't recording all the time but a lot more creepy than a ring doorbell and that put their face on Twitter but that's a different story um and uh I've done things like um automated things around my house I've made um a door on the chicken CPE have chickens we live in the countryside that um opens when it's daylight and it shuts when it's dark uh and then you can sort of take the ideas a little bit further and and start
adding Hardware to do other things like in here somewhere I've got an RFID tag reader and the chickens have got little RFID rings on their feet and and so you can do things like only shut the door when it's dark and all the chickens have gone inside and if they haven't go out and figure out what's gone on with them and that sort of stuff um and and it's really good fun because you're not limited by what a manufacturer has told you you can do with your stuff you've got the possibilities that your imagination and the hardware that's available to you can enable you to do oh here we are so this little thing here is an RFID reader on
the Raspberry Pi uh zero um yeah so that's the idea right who's done any kind of physical Computing before anyone okay so what what sorts of things you done there I was say actually Define physical first well so like and computers that interacts with this environment through non-standard Hardware oh I think the very basic things like turn on LED light and stuff like that brilliant yeah so probably we're going to not get a huge amount passed that because obviously some of the people here are completely new but um you can have a go doing some more interesting stuff if you want because I've got a load of stuff here um so yeah the plan for the next how long
have we got for the talk is it half an [Music] hour it's all get kick so well the think we can do the workshop stuff as well so like you know um uh yeah what we're going to do is we're going to pick a device we're going to I think go with this one but we could use that as well um and we're going to do first of all some simple sort of output and some simple input and then we're going to join the two together and then we'll get to more interesting stuff like um analog input and analog output and that sort of stuff so that's the plan does that sound good sound like a
good plan to everybody okay um so first of all apologies like I uh actually this is a cautionary tale right you know how whenever you're doing talks and stuff they tell you to make sure you've got everything prepared well in advance and that you've rehearsed your talk done utilize and all that sort of stuff I never ever ever do that like um usually if I'm doing a talk I'll be doing the slide when I stand up um and this time I thought you know what I'm not going to do that I'm going to have all my talk ready and so the security talk I did earlier on on browsers and security i' got all that sorted out I got my demos
working and I went to pack my bag yesterday and the phone the old Samsung Galaxy S7 I used from My Demo last year wasn't working and then I got here and turned my Linux laptop on and that had broken as well um and so the lesson is don't bother getting stuff ready because when you do everything goes wrong anyway and and so I I did want to show some slightly more advanced use cases I brought the Lego robot last year and I wanted to um show you a machine learning demo using the same Hardware but we're not going to do that today um I'm speaking at uh DDD in Nottingham next weekend I think so I'll
do it then so if you happen to be around uh come along right so but let's get started okay so we're going to we're going to start off in fact what I'll do to make the workshop easier later on we're going to you know get a sealed device out of a packet and we'll go you know straight from the outset what do you have to do to set one of these things up okay so this is from SB components a Raspberry Pi Pico into the sealed packet and so i' got to right have to get in and then what we're going to do we into the computer and start using it okay so um if you've got a laptop and you're
going to be having a go later on might be worth doing this now if you get your laptop open make sure you've got python 310 installed and install the funny python editor okay because it's the easiest way of getting this stuff running so here's funny um and I've set up my Mac to run uh 310 so that it works and I plug it in and actually plug it in holding down the boot cell button and when I do
that I get the option of installing can you all see the screen right there I get the option of installing stuff um and uh do I have mobile phone cover coverage I do so probably I can just install micro I and that should work no that's not working because I haven't got a good enough internet connection so there's another way you can do it which is that when you plug a device in for the first time you hold down that button it uh tells the host machine that there's a USB storage device and to set up the run time all you have to do is install all the PCO micropython firmware on the device literally by copying the
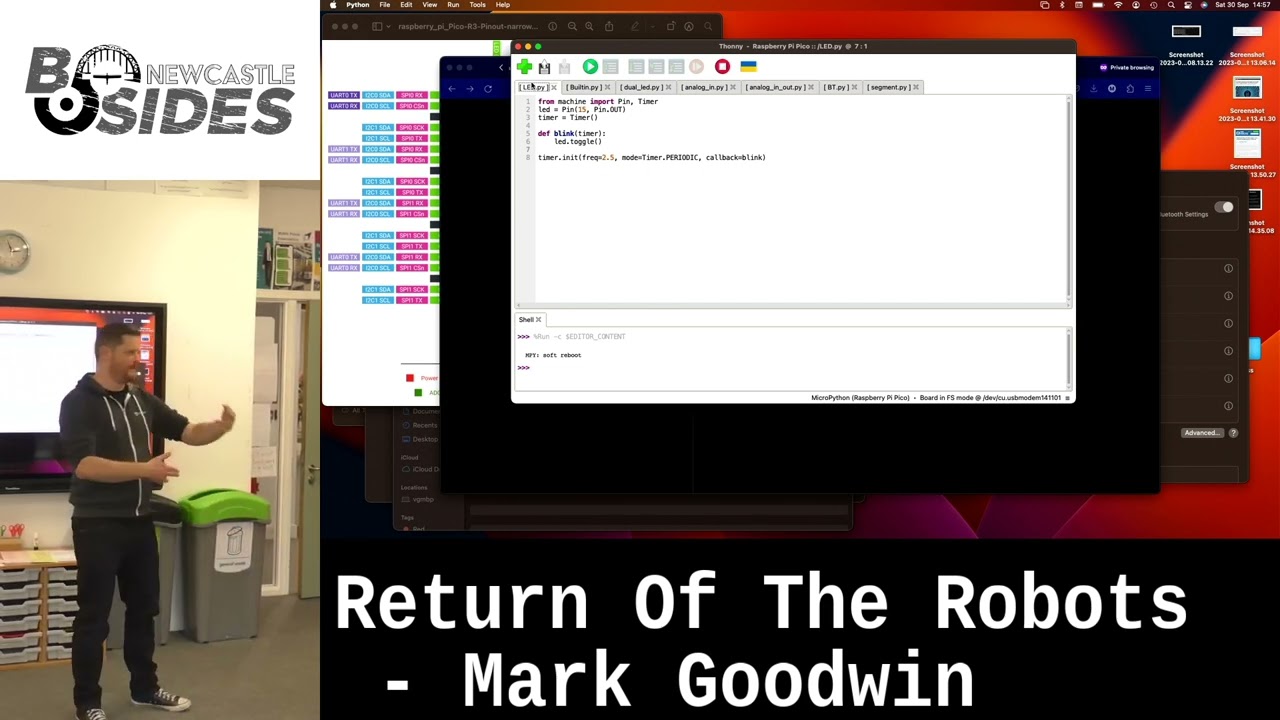
file you can download this from rby.org um and once the file hits the file system the device realizes it's been updated and it restarts okay so hopefully there we go and I've got a python interpreter there and I can say hello and and that code there is actually running on this microcontroller okay so what we're going to do here is first of all we're going to start with um a blinking LED example and uh I'll talk through what the code does but just to prove that it's running on here I'm going to run the current script actually let's get the camera up and running on here so you can see the board there and when I
press play on the
ni on there when I press play on the LED there we go see the LED blinking on and off and and what I can do is I can play with this I can say okay actually I want to double the frequency of this just to prove that it's actually happening live okay so that works we've got that thing working so let's let's let's talk through what's going on with the code here so we're um importing some python libraries for um the pin object in the timer object we're telling it to create a new PIN with the built-in LED that's on the board we're setting up a timer object and then we're initializing the timer in a periodic mode so it's um
setting off periodically at a frequency of five times a second and every time the Tim runs it calls the tick call back which is here and then in there all we're doing is we're saying there's a global object called LED pull that end scope that's this one here and then I want you to toggle the LED I want you to turn it off if it's on and vice versa okay really really simple we've got something immediately already that turns the light on and off right yay fantastic okay so now what we're going to do is we're going to take it one step further and it's nice being able to use that led um what if you want to use a different
LED and so uh what we can do there is um I've put an LED on the board here
uh okay and what we're going to do is run the same code with a small modification to make it run on the other board with the LED plugged in now this one here uh rather than using the built-in LED it's setting up a pin pin number 15 which um if you look at the device um they the labeled look on there and and on the top some of them are labeled by number so pin one is here here so pin 15 will be about halfway down Okay so let's uh let's try this demo we do the same thing as before uh let's create a new one because it's expecting to be saved don't to say that is
fine just
oh hang on I know what's
happened there we go there we go and there you go and we can really show off by saying actually there are two LEDs here let's flash them both at the same time so you're going to do that and there we go got two flashing on and off but this code is showing something else as well which we get to in a second which is that um here on this board that little black thing there is uh a switch it's a button and what the code here does is we've set up the the the pin um that's the LED that's built in that's the LED that isn't built in so we set up an output pin for an LED and we set up
an input pin for the button and then when the timer runs like it did before we're saying if the button is pressed down I want you to toggle the LED that's on the board but always toggle the LED that's built in okay and so when we run the program unless I press down the button the LED that's on the board doesn't do anything at all but when I do it's blinking on and off at the same rate as the other one and I can have them either out of sync like that or in sync like that just by letting go and pushing down the button okay so so that's kind of like the sort of hello world of um
microcontroller stuff we've got really really basic digital IO we've set up a pin for input and we've set up a pin for output we've read the uh state of the input and we're using that to make a decision in our program and then we're using the outputs to allow the the uh device to interact with its environment okay and is that does that all make sense is that all clear I explain that okay brilliant okay um before we move on I just want to talk about different types of devices um does anyone know how um a Raspberry Pi Pico like this or um an Arduino like like the one on this robot and does anyone know how those
differ from something like for example um a Raspberry Pi computer the P are more said for microcontrollers while raspber P has a full operating system usually exactly yeah yeah so a a PCO and an Arduino they they're microcontroller boards okay so um what they allow you to do is they allow you to load um very lowlevel code straight onto the um storage of the device um and it only does that one thing yeah um a Raspberry Pi uh so a pi Z or a regular raspber rep like this it's very much like um a regular computer in that it's got um uh an operating system inst toed that allows you to do various high level things with
fancy Hardware they've got networking Stacks they've got a full Linux kernel they've got you know various different types of storage and all that sort of stuff the USB connectivity there's a built-in um uh bus for a camera module and all sorts of stuff like that so so this is much more akin to sort of the computer that you'd use at home your desktop computer or your laptop um Hardware wise it's actually very similar to your phone um so generally speaking uh a microcontroller is is simpler you're working closer to the hardware and a Raspberry Pi more like a normal computer and so you get the the benefits that you get from running a high level operating system but it's
much harder to do some of the lowlevel stuff and I'll get to that a little bit in a moment um so uh I use different things for different purposes for example the doorbell I made that when you press the button it's took a picture of you that obviously needed to do um Network stuff it needed to call the Twitter API it needed to do camera stuff because it needed to take a picture um and so uh rasb P was really nice for that because it's got all of that stuff built in um when I'm making use of um computers for simpler tasks like for example the coup door opener um it doesn't need to do any of that external
interaction at all so you can get away with something that um is much simpler but also there are some other advantages to using one of these the big one is it's much easier to do analog inputs which we'll get to in a moment okay um so sometimes when I'm building something I'll use both something like this and something like this in the same device um one example of that is I made a um incubator for hatching chicken eggs and um it turns out it's really really important when you're um incubating eggs but both the temperature and the humidity are absolutely spot- on um if you get the temperature you know a degree wrong in either direction if you
get the humidity wrong it kills the chick inside the egg before it hatches and so you can get little senses like this which will do temperature and humidity sensing for you um it's much easier to make this work with your microcontroller than it would be the grown-up computer and so sometimes you'll do something like you'll have this attached to this and then some kind of link between this and that and we can get to that in a moment okay any questions on the different types of boards and why you might use each okay good stuff right then so let's let's move on we've we've used digital input and digital output so that's where you've got something like an LED which
is either on or off and something like a switch which is either being pushed or it isn't right there there's a connection although isn't and um we've got an example that shows both of those so let's do something a little bit more complicated what we're going to do this time is we're going to make use of a script that allows us to read an analog input um so I'm going to need the controller and I'm going to need a board of some kind um this one over
here we can use
this the bo
out [Applause] so one thing to bear in mind when you're doing this with these devices is that um a lot of the pins can be used for both input and output but almost always there's a limited number that you can use for analog input and there's often a limited number where you can do what's called um pulse modulation which we'll get to in a little bit so sometimes when you're doing things that aren't just digital you need to to give that a little bit thought little bit of thought so and perhaps not especially clear from the diagram but there's a bunch of of pins that are general purpose and you can do input and output through those
there's a couple here that you can use for analog input there four of them look and uh P you can use all of them for PW as well this one is there anyway so if we wanted to use an analog input to sense the environment then we've got basically these two these three here to play with okay so in 31 32 and 34 if we go to the code immediately it's telling me it's using a different pen so now making me think maybe it can do digital conversion more than just
one well let's give it a go why not a um okay so what we need is we need um to connect something from pin 26 so that's going to
be two three four five six pin there need to take some power from somewhere so ground is pin 38 and 3 volt out is pin 36
okay and then what we're going to do first of all is we're going to cheat first of all we're actually not going to have any kind of analog input we're just going to run the script and see what happens and at the moment it's giving us a value printing out don't know if you can see see that it's tiny text can you read that all right and and what what I should be able to do is I should be able to by touching this against either the ground or the VCC we should be able to change the input to that P not
working
it's
okay bear with me a second while I try and figure out what's going on [Music] there I tell you what one thing we can introduce at this point there's some um pretty good documentation on how you can
[Music] un
[Music]
[Music]
Co
no idea what's
happen
El all compared to some else like this guy developing for years yeah like version of that
yeah
[Music] we'll figure out what's going on with that in a minute okay goodness me know did I tell you about my laptop on my phone okay anyway we can take my word for it that does actually work sometimes um um actually do you know what we kind of need to get that working for the next stage I'll tell you what we'll do who wants to play with one of these yeah um showan sorry one two three
four
[Music]
[Music]
[Music] one you got USB cables USB
[Music] cables you get set I got it kept crashing I in okay are you are you running 310 I think it's actually 311 okay I don't know about so the reason I ask is I know that there a bug with um the python TK on pipon 3.8 that makes Tony Crush so I don't know whether whether that's related so if you get that set up while I try and sort this out I'll I will be back in a second [Music] um
do
[Music]
so if you if you don't have one if you can sort of try and crowd around someone screen that does sort of get a look at I put this in the
middle I think [Music] yes [Music]
hold you and then yeah you did and then I say downloading well downloading variant Ino yeah yeah okay what I [Music]
[Music] thought thank
you wait yeah I yeah I think that was but it was a bit like
are you
doing there we go right then so let me plug this back in
[Music] so to show what's going on here I've got um a Lea plugged into 26 on the board and the other end of the lead is an analog input it happens to be a
um working it happens to be a a rangefinder so like you know you're reversing your car you get closest to the wall and it go it's one of those and and so um when I'm a long way away you get a small input as I get closer and closer and closer you start seeing the numbers go higher and higher is there way to correlate that toal distance or yeah so part of the spec sheet for these when you buy them we'll show you the curve of input strength against like okay Aur yeah in the it is a pain in the ass but it's cheaper to do it in software than smth out in hard okay yeah so this one here is
infrared but you can get ultronic ones as well okay so what the advantage of infrared ones is because an infrared led doesn't take a whole lot of power you can have a low power device that gives you that thing now you can see how useful that would be if you've got a robot you know you might want to have some kind of collision detection well there you go you've got a built-in Collision detection thing so if any of you all are playing around with uh your thing a jig later and you want to try and analog input just Nick that from me basically I've got more I've got a couple of each thing I think I just I just like grabbed a bag
of stuff um so it doesn't have to be one of those it could be um for example it could I'm missing like a whole bag of stuff oh it's over here he I told you got some another one here any want so it could be one of these so you know when you're like um using like old school devices and there's a a big like chunky knob you can turn on the front this is the back of a big chunky knob it's just a variable resistor and what we can do is plug the wires from that into our circuit board and then when we turn the dial it will change the input as well so
let's give that a go feel free to carry on talking among yourselves because it's going to take me a couple of seconds to sort out um so I'm unplugging the range finder there you
go you didn't bring any pliers
either a doorbell that you why do electronic engine
so the way these things work if you've never used one before um there's like a a strip of resistant material built into them yeah and then there's um a sweeper that goes across the the length of the material and then depending on how far along you are the effective resistance between either end and the sweeping changes okay so if you put one side of it on your um uh VCC and the other side on ground and then this on the input of the thing then as you turn it you'll change the voltage on the input pin that's what's happening so let's let's wire this up and see what happens and this is this a tiny tiny
sibling of these which is this pass that around that's what we call a usually call a trim potentiometer it's exactly the same thing but it's in a tiny package and often if you've got a bit of electronics and you want to be able to tune something you'll find that on the board so you can tweak yes so I'm going to plug the middle lead from this part onto the pin that I was using a second ago on one side I'm going to put it on to the voltage Supply the other side on the ground and then hopefully we should see the values changing when I turn the Dial H
on there we go so now turn this one way all the way down to one Z I'm turn it all the other way all way up to top and so just by turning the dial I Chang the input right so um that's an input what we can do now is we can join up the analog input and some kind of output right so um probably a good time to introduce the idea of pwm has anyone heard of pwm before okay um uh how can I best demonstrate this I know what we'll do we'll take the blink example that we used to start with and what we're going to do is we're going to make it blink faster and faster and
faster and you're going to see what happens okay so here's a blink example ripped straight off from the uh Ari website we're going to press play on this and let's go back to the camera I tell you what they they should always have chairs when you do this because like this is the first time I've done this talking has been a chair sitting down absolutely so you can see the light blinking on and off there yeah so let's change the frequency from 2 and a half Hertz to 5 Hertz right and it's blinking faster what happens if I changeed that to uh 20 htz thinking faster what if I change it to 60 HZ can't really see that it's blinking
anymore it just looks like it's on but can you tell your life I can just because it's that's right yeah so it's it's blinking at blinking at 30 HZ because it's toggling at 60 HZ so if I double that again you barely seee the naked eye and if I double that again ain't no chance right but what you'll notice is that that's not as bright as when it's on slowly right and um this is useful to illustrate this thing called pulsewidth modulation because when you're doing digital output and something's on or off it's easy to see what's going on when you're doing an analog output actually it's not giving you like a a sort of voltage in between
it's giving you full voltage and then none but it's turning it on and off really really quickly and how long the on is compared to the off determines how how powerful the uh yeah yeah it's like a duty cycle thing right and so um when you've got something like an LED or a motor there's a couple of reasons why you'd want to do that the the first is that um LEDs the uh color temperature changes with the voltage so if you want it to be the right color but dimmer you have to to cycle it on and off and with a motor if the voltage is too low it's more likely to stall as in stop turning
and then that can burn out the coils on the motor so with nearly all electronic and electromechanical things it's better for it to be on or off than it to be sort of on and therefore pulsewidth modulation is how you control them right and as an aside if you're in an electric car or on a train or something like that and you hear the sort of sound that is um pulses of power going to the motor yeah um right so let's illustrate that we're going to take the example that we've just used where we're reading an analog input and we're going to actually set up an output to um write an equivalent value so where
are we let's it's a ready made example so let's use that
one um but what I'm going to do is instead of using the LED on the board I'm going to use the built-in one because it's
handy so you see the LED on the uh on the board it's changing with brightness as I'm turning the dial and the way that works is this here look I'm set setting up the the pin as a pwm pin so pulse W pulse width modulation I set the frequency at which it turned itself on and off so that's a thousand times a second and then the duty um as in how much on against how much off is defined by the stuff that I read from the analog input and then as I turn the dial you can see that the effective brightness of the LED changes just by me playing with the input so it's always yeah the am yeah it might just be
teeny teeny bit of so it might be like um one millionth of a second every thousandth of a second or it might be a thousand of a second every thousand of a second in which case it's always um it will depend on the hardware to see it flash that let's give it a go oh there we we go look yeah there you go that's a brilliant idea thank you there we go so you can see Show's happening there good call thank you bloom so there we go that's what pulsewidth modulation is now I get paid I don't get paid and and when when you're controlling Motors and things um that's pretty much all that's happening yeah
there one more step and I'll get to it in a little bit which is that um this is only sorting out how to um set a voltage and to make a motor go one way or the other you actually need to to change the polarity of the inputs on the motor and for that you use a thing called an H Bridge driver and I've got one of those here so if you want to play with an H Bridge driver here is one and we can get that going in the workshop e bit if you're interested okay so um the the next bit and we're not actually going to do this because the phone I was
going to show you is broken but we can like have a play ourselves is we've used basic input and output here we've done some analog input using stuff like the rangefinder and the potentiometer we've done um digital input using a button we've done digital output using an LED we've done a pwm using an LED and we could in theory do it with a motor as well what about more complic thing like what happens if um you've got something like um this thing here this thing here is a little button board that allow you to um illuminate the buttons in different colors and have them pushed right that's a lot of different pins to use well you might
just and bit bang those are the different pins on the on the p and that would work fine what it's what if it's even more complicated what if it's like um uh I must have something somewhere that's interesting oh yeah here's a good example uh this thingy here is a Bluetooth receiver yeah so I can pair that with my phone and um send and receive data through it all right um well you need to have other interfaces okay and um nearly all of the microcontrollers and boards that you can get a hold of will have some kind of Hardware support for common ways of doing stuff so um there will be um Ur pins for serial connections and
there will be a specific pins for protocols like the Phillips i squ c protocol and stuff like that and um really um the main thing that you need to know is that almost always when you're doing that there will be a high level um set of interfaces that allow you to do the thing so you don't have to write your own code to read to see when the serial Line's gone high and wait X milliseconds and then wait to see if it's gone low and then figure out how many bits you've seen and whether or not that corresponds to such and such a number you can normally just say actually I want to read some serial
bites and I set the board R to this with you know um apparity bit and whatever um and so like almost always there are abstractions and you know with the Arduino library with the micropython stuff pretty much anything you're going to be using there are things that help you to do that okay but that last piece there the there are more um high level ways of doing communication is the the stuff that that Bridges the gap between something like this and um something like the the PCO or the Arduino because as soon as you figured out how to to do a serial connection we'll set one of these up in the workshop bit you can
then have a general purpose computer talking to a microcontroller which gives you the you know um networking stack high level Hardware interfaces magic if the the pi and all of the um rapid um pwm analog IO yada yada that you get from a microcontroller yeah and when you're building actual robots usually you need both you need both the the high level access to the system but also the real time um and IO capabilities of the of the lowlevel stuff okay so we'll play with that in a bit but basically that's all you need to know the next step is to play with it right so what we can do is there are three laptops around the room
yeah so probably 4ish people around each laptop and we can sort of play around with some different stuff everyone can have a go sort of try and get things working yeah does that sound good all right anything else you want to know before I stop talking to the to the group
Related talks
 19:16
19:16 31:12
31:12 1:13:10
 39:36
39:36 9:18:01
 8:14:55