The Secret Lives of Debuggers
Show original YouTube description
Show transcript [en]
all right so this is my presentation um so one thing i want to say is just bear with me a little bit because to get you used to this type of stuff we're going to have to go through assembly language and it is boring so that's half the presentation the other half's really fun i promise so anyway who am i you heard i'm just a guy who likes security i'm a php python application developer part of dc 801 group i also help run 801 labs uh just a little quick legal disclaimer i'm not responsible for anything dumb you do because you've learned it from me so don't blame me so one thing i wanted to talk about is
that when we think of binaries when we think of executable files we kind of think that's it right like we don't have the source code we don't have any of the documentation we have all we have is this binary well we're just pretty much stuck and there's nothing that we can do in that sense you know there is the i always love this quote from the matrix is that there is no spoon there's only your own inhibitions or your own perception of reality that's stopping you from doing whatever you want to do in our physical limitations on computers what it boils down to everything's a file everything's just data or data being interpreted by a
processor or a system so we talked about this a little bit one of the misconceptions people think of when they think of of software is just how it's finished when it's in a binary form i mean this is convenient for companies too because when they distribute software they're like we don't they expect you to not mess with it there are techniques and and things they can do to make it more difficult for you to modify their binaries or modify their software after being deployed but we're not going to go into those today we're just going to give you a brief introduction on how to modify binaries and learn some assembly language so a couple misconceptions about
assembly language is it's hard to learn yeah it is difficult but i mean so is any other programming language anything that you you know work hard at eventually it'll start clicking there is a huge learning curve with assembly language but if you just kind of sit down and do a little bit every day maybe a half an hour an hour just reading some of it and learning it you can kind of get familiar with the patterns and the concepts and the understanding that's required to read assembly and use it um so one another thing is there's you look at the assembly manual for intel syntax and the books are like this big this is one book
like ray ronan brought in the intel assembly book and it was like i thought he brought in like six for everybody no it was one book i mean it was like tomes yeah it was like this tall i should have brought it in it would've been a good but like oh out of all of that book you only really need to know fourteen instructions consist of ninety percent of all code and so once you've gone about twenty or thirty instructions you probably covered every scenario that you will encounter with any compiled code the only reason you need this giant tome is if you're trying to do something special or outside of that realm also in that case when you're writing
assembly assembly you write for one architecture does not transfer to another architecture so if you write something in intel 86 it's not going to go to an arm processor it's not going to go to a power pc you kind of have to rewrite it for those and that's why that's one of the reasons why the compilers were invented is so that you could write programs in one language and it could be ported to different architectures so quick introduction into assembly language it's a complex for intel assembly language in x86 we're going to talk about 32-bit instruction set um i will talk a little bit about 64-bit but it's easier to just start with 32-bit and then move up to
64-bit once the concepts are kind of solidified um it's a like we said it's a con complex instruction set um it has executable instructions and assembly directives uh you know consists of three types of statements there the the executable instruction assembly directive and then macros so when you start learning assembly language the thing that you need to memorize pretty much is this chart you need to be able to go from decimal to binary to hex now that being said that doesn't mean oh i have to memorize it today but after a while if you do this enough you will start it'll just become easier and easier to remember all these things and just being able to be like oh you
know x 0 e is 11. i was looking at that that actual specific one the other day and i was like e yeah that's hex right because that's 11 i'm like is that 11 and i looked a little weird like yeah it is 11. i wasn't actually expecting the value to be 11 but then i forgot about the extra space that c has for strings with the null terminator so it's a good idea to start if you want to really get into this just kind of memorize the conversion and so the another thing you need to take into account is that in assembly we're going to talk about binary and we're going to talk about bits
and bytes and words those are the ones that come up a lot and the thing the key to remember is that one bit is just one is one on and off the byte is eight on and off so it's eight but one byte is eight bits one nibble is four bits but they don't talk about nibbles very much but they do you do work with nibbles a lot so another thing is so you you have double you can have word and you'll see double words so that's just saying that you have so word being two bytes and then a double word would be four bytes making sense so far pretty basic stuff next we have intel syntax and 18t syntax
the main difference between them is just how their format how the language is formatted i'm going to be talking in intel syntax today att syntax is not there's not a big difference between them i mean there's nuances um the the one that's confusing is that in reverse order of the instruction set so here's just some simple um syntax we'll go over the instructions a little bit here but we're here we're just moving the value of one into an e x and another one here we're moving the value of one e x and you see the order is flipped but it's the same instruction so just remember if you're seeing a bunch of dollar signs and percent signs
you're in 18t syntax if you're not you can use intel syntax so a couple important things to think about with the binaries is the sections of where the data is located the data section is where your static variables are going to be and everything that's declared beforehand before you compile um the bsvest section is for declaring the individual variables and then the text section is the important section that's where the actual instruction code is located all right we good anybody lost have questions
um i haven't really looked because i haven't been really important so far to me but i believe that that section just has the declaration and just kind of like a symbols table that uh defines okay this very you know when you say x equals this you know it's defined here and then you use that variable throughout your program so we have registers the registers are kind of the heart of assembly language and then every register kind of has a special uh purpose and this purpose is arbitrary it's basically just whatever's you know whoever the intel designer decided that's what we're going to use this register for they're all technically the same physical hardware and they're just different
sections of the cpu that do the store data and one of the more popular ones is eex ex is always going to be the return register so later we'll talk about calling procedures but everything basically when when something calls something and it returns it's going to store eex so it's kind of like the magic box where all your wherever you're expecting something for something you call that's where it's going to be evx being the base pointer the ecx is used for counting and looping like i said these are just general conventions there's nothing enforcing this but what it's do what they're saying is that when you're writing code and you're doing some looping or operations you
know you edx is a recommended one to use edx for i o pointers edsi for source pointing for string operations uh edi for destination pointer of the string operations and then so esp and edp and eip these are important because they deal with the execution flow of your application so esp is the stack pointer it basically points to the stack we'll talk about the stack in just a little bit mbbp is the stack frame base pointer so it's kind of the we'll talk about the stack we'll go over that a little bit but ep is a cool one because ep is actually the next instruction so when a lot of buffer overflows and other things that when you want to get
control of the ep if you can get figure out some way to get your code into eip you can do exploits do other things
like we said in 32-bit registers uh they are 32-bits long and 64-bit machines they're 64 bytes bits so this is kind of a show you the sizes of each register the r is a 64-bit version so we have eax as the 32-bit and then we can also see references to the lower versions of memory like a-h and a-l here and basically that's saying is that we're instead of looking at the entire register we're just going to look at a small section of the register here so we're just going to look at these for if we said al we're going to look at these first eight bits we say a h we're going to look at
these high the you know 8 from 16 bits and so another important register is the e flags register and this basically anytime you do any operation depending on what that operation does it will flip these bits and this is important for controlling execution flow we'll talk a little bit more about that later so for the stack the stack is an area of ram that is used to store variables and temporary memory this track is created when you when it's loaded so this is where you're just going to push push variables and if you need to store a register you're going to be pushing it on the stack does anybody have any questions about anything i've talked so far any
confusion want me to repeat something good okay so with the with the stack esp register is the the start of the stack frame and ebp is the register the ends of the stack frame so esp is basically it's the stack starts here and the ebp is okay we're going to grow ebp and then we'll also see that ebp will esp will get um ebb will put the esp when we do a stack uh call so anyway the stack is just basically we're gonna push data on and we're going to pop data out talked about that so here's kind of a visualization of the stack we can see here that anything below eep is actually going to be the current
stack frame so if you can think of this as like your c code this is where you would initialize this is where all the local variables in your local c code or your function are being declared and then anything above here is anything outside of your function so this is why functions can get data outside of themselves but other functions can't get data inside of when they call another function they can't get that data because every time you do a function call it's creating this new stack frame and it's allocating more space on the stack and then we're you know we have kind of a visualization does anyone have any questions about this we all good
so this is a common section of uh assembly language that you're going to see a lot when a stack frame is called and so basically we have this function called test and then we're going to see we're going to push ebp onto the stack and then we're going to move ebp into esp and so you'll see this every time that there's a new function called or anytime we're doing a stack frame setup and then another another thing to kind of keep in your mind is there's calling conventions and these can switch so if you have the callee save registers these are basically it's that the collie has to take care of all the registers so if it's working with data
it's got stuff in the registers and it's like i need to call this function and you're using the callee save registers then the callee or the caller save registers then it's responsible for taking care of eax edx pushing them on the stack and then popping them back off when it returns and then the same for kali registers where it's like okay i called you the callee is like oh okay i need to take care of all these things and then put them back before i return all right so here we're going to start getting some more of the fun stuff so we're going to learn nine instructions today there's the knob instruction this is a
great instruction if you want to just kind of overwrite some memory and you can like if you if you go to us we'll show this later but if you go to a specific point of memory and you can just knop it out and so when the instruction set gets to that section of the memory it'll just continue just doing nothing and then continue on its way the call instruction uh it calls another section of code so it's basically like calling a function so when you see a call it's going to go to a different stack frame and then we have return return to mac frame move push pop subtract add lea is an interesting one because it's
load effective address basically it pulls information out of memory and puts it into a register or put you can push it onto the stack so we have another five instructions copies the frame pointer leave copies the frame point of the stack pointer test so test and compare and jump and uh jump not zero these are these are your if statements so with these instructions like test you'll see test e x e x you're like okay why am i testing the same register that seems silly well what it's actually doing is it's test does an and and it ends both of the registers together to see if they're equal to zero so you do a test
and then depending on the jump not zero let's see if it is zero or if it's one it'll return one if anything else is in the if it's not the same uh brain part okay makes sense right question so we've just right there we've learned you know 14 instructions so you've learned pretty much a good amount of instructions you need to do just about anything you want to do with assembly language and so i've included the operation code here because the operation code is important when you're actually modifying binary because you're not going to see knob you're going to see 90 and hex and the thing is when you're modifying your binary you need to find the specific
code section and basically you're going to look at your disassembly and you're going to look at this hex binary you're going to say okay i believe this section is actually correlated to this instruction set and then you go in through and make your changes just a quick talk on symbols symbols are basically just a mapping of the addresses they're used during the linking process to resolve references to functions so basically it's just kind of something that the linker uses to say oh when you said test it's actually this memory address you can view the symbols with nm it's a program that comes installed with gcc and other linux tools another thing to just kind of brief
mention briefly is the elf instruction executable link file basically it's just the format that the binaries in that linux can understand so that it can execute it another thing that just quickly glance over is big indian little indian it's basically the order the order in which you read the least significant bit and the most significant bit so in this example zero zero zero one is the 128 and big indian and little indian zero zero zero one would equal one so depending on your architecture if it's big indian or little indian it's important because you want to read the the data correctly
yeah so another kind of confusing thing is an intel little endian on register is big indian memory so when you're reading memory it's in big indian when it's actually being used in registers it's little indian this is this kind of visualization the thing that's most confusing about this is that it's not reversing the bits exactly it's reversing the byte so zero a being in hex being one byte isn't reversed but the order of zero a and zero b is reversed as you can see here all right we got through all the boring stuff we're good
all right now to the actual meat of the presentation the fun stuff um if you're still confused i'm sure i probably screwed something up or said something incorrectly most of the stuff i've learned in open security training they have a really great course it's the two day course it's all free videos you can watch on assembly language so you can just go there and get more information if you're still confused or just like i didn't understand anything it took me a while to kind of get used to this stuff so don't you know if you if you feel like uh this might not be for me just spend this is one of those things you've got to spend time on
so quick set up for cali uh so i did all of this in cali i actually ran all these examples to make sure that what i was saying is true uh to compile 32-bit uh binaries in cali you need to have the dcc multi-lib and then you just compile m32 there and that'll compile a 32-bit binary and so another kind of useful tool to have is nasm nasms installed automatically on cali but these are just some other assemblers if you want to play around with them another very useful tool is object dump object dump basically will will take the binary and break it out into its hex version and its assembly version so you can use object
dump to kind of just break everything out and then you just take the sections of code that you're most interested in our are alternatively dump bin is for windows so you can use dump bin to do the same thing as object dump so this is hello world and assembly so this is everything that you need to run hello world and assembly language and basically all you do is you have your your start section and then your global start here your text section your your data section here below and one this is a little bit misleading because you're like oh these these are instructions these should correlate to actual binary instructions there's actually micros in here that nasm
understands like this bottom part here is a micro where it's actually going to take the uh sorry the length of the db text hello world and actually compute that and then stick it in the binary which i'll show again so we just run nasm elf hello asm we get an elf file we link it with the linker here we tell it's an elf i386 say hello we have an executable so let's take a look at the object dump of that binary that we just created using nasm so as you can see here the instructions are actually completely different from the nasm instructions and all we have is just a move so we're going to move the value of 11 into edx
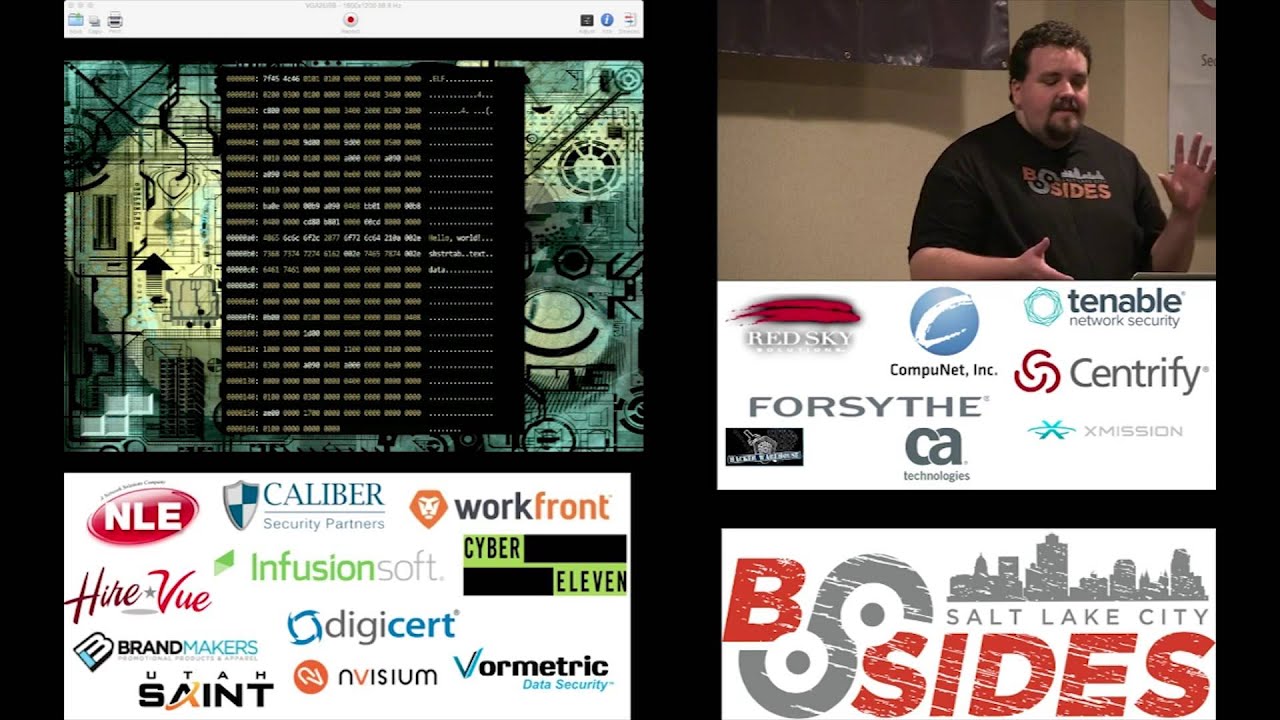
we're going to move ecx this value into ecx which this value here of the 80490 is the actual address of this text string and memory so it's basically just like a pointer in c or c plus plus and then we're going to put the value of 4 and eax and then we're going to call this is a kernel system call when we call n86 so what that does is it calls the kernel and depending on our registry settings it's actually going to do different do different things so this is that entire hello assembly language nasm nasm assembled binary so this is you can visually see you have seen hello world in binary or or hex i guess is really what it is
i should say so we can see that we see the elf string up here we have the hello string we have the text data section the rest of it's just pure hex looks like complete nothing right so let's go back to that system call so if we're doing something in c we'd say cis write we have an unsite unsigned int which is the file descriptors basically the location the file a constant char which is a buffer and then the size so in our nasm instructions basically the length was the third was edx was the third argument the text section was the pointer to the message and the first was the file handler so we're basically saying here
write to file out so our instructions are here in assembly and we call we call this the um system call here n086 and let's see and the number the four was the system right so we're saying when we called into 80 and we had ex set to four we're calling system call 4 which basically says go look in these registers and then we said use a standard out to write output to the screen then again here's hello world and asm you can use ml64 which is brought in with visual studio you can do the hello world in windows world we all good and content questions
yeah so like in these registers here we can see that these are basically like these are all the variables that i'm passing to the functions so we're basically instead of saying you know writing it out like we would in c here so we have the c syntax we'd say system right on you know we'd pass in all the function variables we're just putting those values in the respective registers and then calling the kernel to actually execute and write to the screen
okay so this is a simple c program the hello world and so this is an object dump of that simple c program and i've there's actually a lot of stuff that the gcc will add to the binary and so it'll be a lot longer than this but this is basically just the important parts of the code that i'm highlighting here so in maine maine eventually gets called so you always think oh mains where everything starts but actually there's a bunch of preceding steps and then eventually it'll get to main but that's basically where your code starts as it main after it's done all the setup and all of its management that it's going to do
and so when we were before we were talking about the symbols so when you when you're starting to do this you're using basic binaries you just go and look for main you got to find your starting point right like you would with any program if you had a bunch of source code and you were starting to like okay i need to learn this code you'd say okay where does the execution start what does it start doing so you go and look for main and then you can start stepping through these instructions and going through the going through the binary and kind of reversing it so we'll go over this really quick so we like we saw before this is the
stack frame set up so you push evp move evp on esp so these registers remember they control where the beginning of the frame is and where the end of the frame is for this function so we have this area that grows and shrinks now when we increase the stack we're basically declaring variables so inside your function you say into x and y you're just going to see that the stack is going to be pushed down and the values will be put in put on the stack to represent those variables also it also put that data into register sometimes if it's just a temporary variable that's not being used outside of the frame so with this we just push on the frame
or we push ebp esp uh we're going to and esp 00f not quite sure what that's doing there but so you see down here that we're going to call a test which is actually this memory address here and so the symbols are your representation for you to be able to read this but the computer just says oh i'm going to go to this memory address and i'm going to start executing this code up here so then it hits this code area you know does what it's going to do says okay i'm going to print hello world and then we're going to return beef and so one thing you can do when you're doing when you're doing reversing and
you're just working with binaries you can put in this easy to recognize hexadecimal representations of integers or anything so this is i put in b here and then i can see beef is actually over here in this move instruction so when it returns this function returns it's going to move beef into eax this is important because eax like i said is just the basket where everything looks when it comes back for the function so if this function was int of type int e x would have the return value of whatever b would be in decimal form and so we can see that when we return main we're returning zero ff to the previous function that called
main which so when you know when you return you can have exit codes and stuff like that so basically you can just see even maine itself put stuff in ex and then returns back to the main section so one of the the good tools to have when you're doing binary analysis is beta python exploit development analysis for gdb one key thing to know about pita is that it doesn't work with python 3 and newer versions of gdb use python 3 so when you're installing it it works really well if cali because i think it uses the older version so you can just get it installed and run it this is what peta looks like and the great thing
about peta is it gives you a visual representation of what's actually happening inside the binary when you're running it and you're executing it so you can see here you can see your stack down below this is this is that word actually says stack i know it's hard to read this is just a screenshot then here's your code so there's a section of memory you're working with and then here's all of your values and all of your registers if you don't have this you have to use gdb and gdb is just a co a command line written i believe mostly by richard stallman and he just has a command line you're like okay i need to look at exe type
slash xx and look eex look at the value here you can just type context and just gives you a brief overview of everything that's going on so quick introduction to gb we have the run command the break and then we want to set the disassembly flavor because everything in linux is going to want default to 18t syntax and or sorry 18t syntax yes so we want to set our disassembly flavor to intel we use the disassemble function to look at the actual instruction set on the function or the area we're looking for we set breakpoints so we can stop execution do info registers will tell us what you know the registers are doing info breakpoints just shows us all of our
breakpoints so how many people here have used a debugger so you're if you know what stepping is right you hit a break point you stop execution stops okay that's critical for doing this because if you run it you know it's going to go way too fast for you to do anything so this is gdb disassemble main so we say we want to see what main looks like when it's disassembled and this little arrow here is the execution point this is basically if you hit a breakpoint this is where you're stopped in memory and the info registers info breakpoints this is a useful command the x slash x it basically lets you look at the register in a
binary format or hexadecimal format then print ex lets you print the actual value that's stored there and so if it's a pointer if you do x slash x it'll give you the pointer if you do print slash x it'll actually follow the pointer and then follow the memory to kind of see what if it's a string or something it'll fall out to the null terminator and give you all that information okay so this is our example program that we're going to modify so we're going to actually modify some code make some changes and change how this execution is and so basically what this is we have our test hello world we have this hidden function which is
not called by main at all it's just in the binary and then we're going to call test we're going to sleep for 15 seconds and then we're going to compare arc b1 as the variable that we're passing to main see if it's secret if it's secret we know we've got it if it's not secret we're sorry you missed it so we compile it and then we open it up in gdb and we do run test and then we basically what this does is the run test is going to pass that test argument to this binary as arc v1 and so we say hello world sorry you missed it and we say inferior process exited with zero three three seven
which if we look at the code here i said oh return 0xff instead of 0.
so one one thing that kind of gets confusing is like all right i'm going to go into memory i'm going to change something like oh it won't let me why well you with the gdb you can only modify the binary if it's running in memory so before you actually go through and change stuff you have to set a breakpoint on main or set a breakpoint in the section that you're interested in run it and then you can modify the binary itself so here we're going to break main and then one other thing is you can break on specific areas of the binary so if you saw the disassemble main in the tech section you can see okay this
memory section over here like this zero eight zero four eight four bc uh we can say we can put a breakpoint specifically on there so we're not going through all the execution so we disassemble main and we're going to modify the binary here so that we don't because the 15 seconds is annoying we want to change it to one so we're going to just make a very slight small change to our binary and so you can see here we're we disassemble main so the um the left section let's see wait for you guys so the first section over here is going to be the before and this is the after so if you take a look we're passing
down here we're passing f to esp and if we look just before we do that or just after we do that we're calling sleep and so i wonder if this variable is actually controlling how long we're going to sleep for so using the set command and the set command is where all the power comes in and modifying the the binary with gdb we call set and we call set we put in parentheses we put a star we go to this memory address over here the zero eight zero four eight four bc and we say we're gonna set u equal to c7 what that's going to do is it's gonna change the zero x f to uh zero x one
and then we run the code and we show that okay it's only sleeping for one second so now that we've modified the binary uh with gdb we want to go through and actually modify it with uh on the hard drive and actually manipulate the binary there and so what we're going to do so this is what the value was before on the memory address at that location so it was 0f2404c7 and we modified it to zero one so we see that the we're just changing this f to a one does everybody get that makes sense very quick easy change we keep the rest of it intact because the rest of this this information is actually the hexadecimal representation
of this instruction we change uh f to one um here we can use the exam and just kind of see what portion of memory does what we do x slash i will show us the instructions so this is useful when you're kind of developing your your modify modification for your binary because you can um examine it change it a little bit and see how what instruction set it's going to generate and so once you've gone through it in gdb you're going through it in a debugger then you can go back and in the binary itself using vim so you use them and you call x xd which will change it to what xxd basically does what object dump does but it gives
you a hexadecimal representation of the entire binary you go through and edit it so you go through and find the edit that you want to make and then you use xd to re-take that binary so when you do edit in xxd you don't have longer have a binary you just have a text file and then you need to run it through back through xd to create a binary and then we'll see here that and we can do a diff to see what the actual differences are so when you're in xxd this is what you're going to see right you're going to see an address here and then you're just gonna see a bunch of hex group grouped
together and we've made the so the slight change we've made to this binary is we've changed this f to a one and somehow it dropped this zero a i don't know why this is weird so we can see here that the we've just made a slight change to the binary so we found where this two four zero f c set or the c seven zero four c70424f correlated in the actual hex editor and we made the slight change and then we wrote it and we can run it so at that point we're just changing a slight variable now if we get down to if statements you have jumps now if you want to you know change a jump
um you can just there's a couple things you can do you can try and not slide you can try and knop over it or you can just change the instruction so what we're going to do next instead of oh you know because let's say we don't know secret we're going to change the binary so that it says you got it for everything that isn't uh secret so quick note on jumps uh there's all you'll also see jump not equal and jump not zero i think i got these backwards i'll have to double check again but basically just remember for jump not j z and j and z that there are two names for the same thing
and so what these jumps do is depending on the e-flag when you go back to the e-flags depending on what operation you did before you're doing the jump you're going to have flags that are going to be set and so to modify the jump we need to know what flag is going to be set depending on what situation so here we have j n z and then the opposite is j e so we go through we examine the memory we see that the instruction here ends in 74. we know 74 is the op code for jnz if you go back earlier in the slides we change 74 to 75 and then now every time we run the
binary depend no matter what we uh put in there it will say you got it so if we go back here to the instructions we've now changed this if statements to say anything that isn't secret will actually give us the you got it string
i'm done okay all right uh i am out of time so we'll just talk really quick about calling hidden that hidden function i'll publish these slides you can go over in more detail but basically you just run these instructions change that little section you can change the code execution with gdb you can just call the hidden function itself so you say call and it'll actually run the the function so you can run functions outside of their actual net execution setting so you can easily see with just some simple modifications you can get in there and kind of make changes to binaries and then here's some more references and stuff if you're interested and that is it
thank you
Related talks
 29:55
29:55 26:43
26:43 44:52
44:52 39:16
39:16 42:21
42:21 35:42
35:42