Robots For Complete Beginners - Mark Goodwin
Show transcript [en]
look hello
how's everyone have you been to besides before is this is your first time for us good good well hopefully you'll enjoy it so this this Talk's a little bit different um usually when I come to these things I talk about security stuff security is what I do for for a job um I leave an upset team for a company called Cotillion and but I also like doing other things and one of the things I like about the the security system that have you seen is that actually there's a lot of people that are into all sorts of different stuff right and and I wanted to to share some enthusiasm and um we're only to start with this is that I
remember my first computer you remember your first computer my first computer was brilliant right it was absolutely fantastic it had um 32k of RAM it could display eight colors right I could I could um reprogram this in return or get this discs yeah and um it could do sound and I could share programmers with my friends at school sometimes we would get them printed out and type them in and it is brilliant right and computers are even better now right and I've got a computer in my pocket that's um apparently more powerful than the computer they use to the moon landings um my car has got computers it's got It's got computers on the computers it's
got computers on the brakes um the charger from my car has got computers in it and the display adapter for my other laptop has has got a computer they're everywhere right but they're also a little bit disappointing aren't they you know if you told a six-year-old me that I have a computer in my car and I couldn't play Chucky head on it I'd be really really sad and so what this talks about is it's mostly about how to recapture the fun of having computers that do exciting things for you so that's what I'm hoping to do and so the talk is about building robots but what is robot does anyone want to venture an idea as to what a robot is
any ideas okay that's not a definition I've heard before I like it okay that's what we're going to talk like this someone said it's someone with no Personality yeah that sounds pretty good isn't it okay so so I'm going to talk a little bit about what I am going to talk about which is I'm going to talk about things like this okay so my journey with this subject starting when when one of my kids came to me and we used to like have a summer holiday project in one year we made a go-kart and the next year my younger son said to me Daddy yes can we build a robot to mow the lawn and
anyway that's ridiculous we can't build a robot maybe they're actually like do you know what that's a really cool idea and the thing is that you can't you can't just go to like a shop and buy parts of the Lord made robots so first we had to build a 3D printer to make the parts and then we built this robot and and this is the first version and and and this is just a machine that's controlled by computers right um and it's a little bit like what people think about when they think about robots because it moves around and it had a camera and a little display and stuff um but it could also be something like
this did anyone tell what that is from looking at it anything in the picture you recognize looks like a potato it's actually eggs it's an incubator Well Done Right so so this is a robot I built which is a Linux powered chicken mama it's a it's a box with a heater in it and a little Raspberry Pi and a humidity sensor and a temperature sensor and when it gets too dry it blows water through this bit here to make the air more humid and when it gets too cold it turns on the light into that foil and it warms it up a bit and then a few weeks later those eggs turned into chickens it was magic right but
that's kind of like a robot isn't it it's a computer it does stuff or continuing on the theme Here you see a theme right so when the chicken disappeared we wanted ways of keeping track of them so we have um computers that kept their environment warm gave them food took pictures of them for us and I was very bored during the pandemic chickens with my friends um continuing theme here this was a a computer controls door to openly close to like can everyone guess what it's for it's for chickens right it's a door that opens and closes and lets the chickens in and out and it's certain important purpose right it stops the fox you
get things are kind of Road can sense their environment and do things and and so that's what we're talking about we're talking about physical computing and actually you know if we're going to be uh really um strict about it well most of the computers we use can sense and affect their environment apparently because you know I'm looking at a screen now and when I touch it it does stuff but I'm talking about how to build our own you know how we can um make our own things that sense or affect our own so let's make a start I think who does a bit of programming and we're doing some programming before here if you wanted to tell me what this
program does
it's python come on someone knows the other secretary yeah it does it help us hello world right and this is like the it's the um definitive simple program isn't it you run it and it has one piece of data that deals with the stream hello world and it puts out on the screen so what we're going to do now um is we're going to do hello world but with physical Computing right now um a word of warning um everything you see here is alive which probably means something's going to go wrong it might mean everything that goes right is gonna it might go wrong it's going to go wrong and that's okay right you know this is
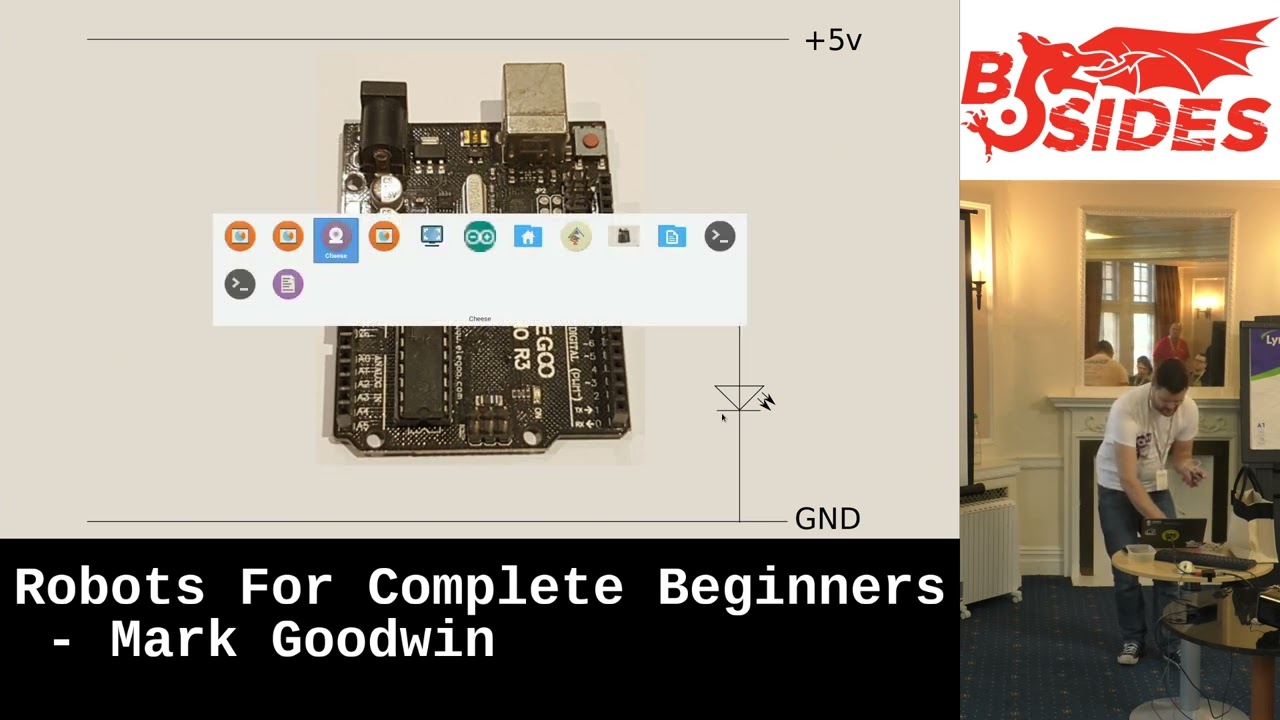
this is like um Tech talks is it adrenaline support I'm okay with that um so what we're going to do is we're going to find a program that I made earlier blue Pizza style and we're gonna make it do something so I need um an output device what can I use as an output device uh I've got an LED in this bag you know how hard it is to type when people are watching you and this has a close cousin or like motor skills generally so I've got to put some leads on an LED and plug it into something um it'll be fine I'm sure okay so you saw me start up the camera program earlier
on the reason for that was I wanted you to be able to see what I'm doing okay so you can see here what I've got is an Arduino and other single board computers are available at the microcontroller development boards and stuff and what I'm going to do is I'm going to put one of the legs of the LED into one of the i o ports on the Arduino and the other one on the ground like this and if you go to the the diagram on the slide uh oops there we go I've got a little circuit diagram that's what's going on here and then we're going to find a program and run it and then that led
should flash it okay so let's find our program uh soil open Okay so really simple program we're telling it that we've got an LED on pin 11. uh actually I don't want that one I want blue let's get a different one um [Music] well it will blink but I want it to Blink differently laughs we want this one instead there we go so we want no input here so literally just an LED we tell it that the LED pin is an output pin and we have a loop which will turn the LED on and then turn the LED off it'll sleep for a second after it's turned it off on little sleep reset Netflix off again and
it'll do that over and over again so let's plug this in and then we'll pray to the demo gods what whether you wanted to succeed or fail and determine which prayer you give to the demo gods and then hopefully when we run this we'll be able to see a flashing LED
okay and file there we go upload so what the status it builds the Arduino project it sends the code to the microcontroller and with any luck so microcontroller is here is there LED is there yay success okay [Applause] who speaks Welsh here by the way anyone speak Welsh a little bit I've been learning because my number's Welsh but I'm not very good it's hard like properly hurt um okay so that was that was hello world uh as a as a Arduino project okay so let's go back to some slides okay another program can you guess what I'm gonna ask here what does this program do not sanitize you but it doesn't you're right it takes some input and then it uses
that input to generate something to Output okay so so it's a little bit like the last one only it's taking some input so how are we going to do some input any guesses foreign yeah that's right so uh I've got a button in here okay so this is a micro switch okay it's called the micro switch because it's a switch and it's small uh closer look for those of you at the back looks like this it's got uh three little legs and a little button that you can push down and when you push the button down it closes the contact between this leg here and this leg here all right and what we're going to do is we're going to
find a different program this time the one that I opened before when I meant to open the first one and it's expecting an LED on pin 11 and a button on pin 8 okay so let's go to our circuit diagram so I can explain what's going to happen when this works okay um so pin 11 we have the LED before and on pin eight we have a switch where the switch closes the input voltage here changes and now there's a little detail here which I'm going to tell you about and then if you completely forget about for the rest of the tool is you've got an input on an electric controller board or something like this and you can't be certain that
has a particular voltage to start with right it just sort of floats around and so when you put a switch on it and close the switch it might do something or the computer might not realize anything's happened okay so what that means is that you need to make sure that the voltage is something to start with and then it changes when you press a button and now you can mostly forget about this because most of the boards that you'll use have little built-in things called pull up or pull down resistors and it means that to start with your PIN 8 will be in this case pulled up to five volts and when you close the switch it goes
back down again so just imagine a little resistor between the five bolt line and heater because that's what's going on inside the Arduino you can normally forget about this as long as you realize that that's a thing and if something is going weird that might be something to check okay so the important part here is we've got our LED on pin 11. we're going to take our switch and we're going to put it between an eight and the ground okay um all we've already had one demo work um those bad statistics will tell you that makes this one less likely to okay so we're setting up an LED on pin 11 a button on pin 8 we are starting the
delay to a 1024 milliseconds we're setting the LED pin to be an output we're telling the button pin to be an input that's pulled up to five volts and we're going to Loop that turns the LED on waits for a delay turns the LED off and then if the button is being pressed it halves the delay time okay so it'll start flashing on and off roughly every second when I press the button that time is going to reduce or at least that's Theory I have no idea if it's going to work let's find out so it's flashing that's a good start okay okay yeah I just wanted to make sure it worked before I put it on camera
and shoot tips okay so let's reset the the board so we've got the light blinking on and on on and off you can see that okay I'm gonna press the button now and it's blinking Fastener and if I keep on pressing the button down it blinks so fast that you can't even see it blinking anymore right now what do you notice about that the brightness of that compared to the brightness of that anyone notice anything it's roughly half okay and that's going to become important in a moment all right when we talk about another concepts of their moment okay so there we go that is our equivalent of hello Mark right so far so good
okay so I mentioned that the fact that the LED sort of dimmed when it went really really fast was important the reason for that is that when you've got a digital system like it might go controller and you're dealing with on and off right what happens if you want your sort of Shades of Gray well the way it works is um you're actually dealing with um different amounts of on and off when you're thinking about outputs right and and this is something we call Pulse grip modulation because when something is sort of on or sort of powerful as an analog output what's actually happening is it's turning it on and off very very quickly and how much it's on versus how
much it's off determines how much on the thing is right so um LEDs you can change the brightness two ways you can reduce the voltage but that doesn't always have the desired effects firstly the output of the lights and competitive voltages and video secondly um the color changes right and similarly if you've got a motor if you turn down the voltage it's more likely to stall and you more likely to burn the motor out whereas if you turn them on and off again really really quickly they behave themselves and you get the effect that you want okay so that little demo where it was having the the um sleep time every time until it got
down to a millisecond it is useful because it shows you like a fifty percent of script modulation so that would be a teeny bit on that that would be a teeny bit off and that would be sort of similar in between yeah have I explained that remotely coherently brilliant fantastic okay now we've done that we can move on to an analog stuff okay um so here we have another diagram does anybody know what the symbol here mean it's a variable resistor yeah so it's a potentially I would say one side of it is on ground the other upside down and put voltage and there's a bit that can move on the in-between and this is
connected to all of the analog input pins on the microcontroller yeah and when you turn the dial on the variable resistor which is the one that I've got here has a little knob I'll show you the camera there we go so when I turn this the resistance between the red and the black leads here you see and the yellow one changes the yellow one is at one end effectively close to the black and at the other end effectively close to the red okay so what we're going to do now is we're going to attach this leg here to the ground on the microcontroller board this one here to five volts this one here to the analog input pin and
then hopefully we can run another sketch that will allow us to have an analog input into our microcontroller have I explained that okay just before I move on to actually uh failing to put the ball together probably there we go so black in the ground red you know dropped the LED that's not what I wanted to happen there we go and that's in the five volts I'll put the LED back on and then we will update the sketch that it's running
foreign I'll be honest with you I'm already surprised how much it works it's got no right to go this well I'll do the rest of it yeah right so we've got an analog program here and this is more or less the same as the one where we were reading the button value and it's different in a couple of minor ways so let's upload the program to the controller and okay I've actually made a mistake here but it doesn't matter because it'll still work right so I've got an output pin again the LEDs on pin 11. I set it up as an output and then I probably should have set up the analog pin but it
probably doesn't matter if it's the Arduino monthly do it for you but in the loop all that's happening here is reading a sense about you now um the Arduino Uno which this board is here has a 10 bit analog input um and when you're doing analog output it has um bits output so what we're doing is we're taking the input we're dividing it by four because that makes the maths work and it means that the amount that the LED is on is proportional to the amount that the voltage is on the input in does that make sense sort of um so hopefully that's going to work organic little pressure to the demo of gods please oh and the LEDs falling off
foreign
just put the LED from the board if it falls out again I'll do that and how come this time you didn't use the pin mode output pull up and well so we need to be the pull-up for the input not the output um and um so because there's not an input um that isn't analog we didn't need to pull up it's kind of already um uh threshold set for the analog because the one end of the potential which is on the ground the other ends of the Firefall so when you turn it it's somewhere between the two so it's always going to be something you expected you see on turning that potentiometer and the LED is getting brighter
as I turn that up and down okay now what we're going to do now is we're going to leave the hardware completely the same um aside from me dropping things and having to put it together again because what I want to demonstrate here is that once you've built some Hardware because this is a system that you've built you can change what the hardware does based on the software that's on it right so same Hardware we're going to change the program and this time we're going to [Music] uh bring in a different component to the system uh and the name of this project is analog i o plus serial if anybody guess what I'm going to do
right back to the console yeah we're gonna we're gonna interact with the console okay and and actually this is a um really useful point because um one of the first questions I get when I show people this sort of thing one of the first questions I get is what should I use because there's a dazzling array of stuff that you can buy for doing these kinds of things these days so you've seen the Arduino I've got there and you might come across these things here so this is a um the Raspberry Pi 2040 microcontroller board here so it's it's on a little um project board you can see that tiny little thing there is it will break it there we go so that
that's another type of board you can use this is another like microcontroller or you can even get like little single board full featured computers so this here um is a Raspberry Pi computer which rather than being a microcontroller is actually a fully featured computer running limit so you can actually do stuff um we have on there doing something with the AV and but you can you can build projects using either of these and so people very often ask the question what should I use and um the the short answer is that um for most applications well for some applications it doesn't really matter it's mostly about the tools that you use and if you like writing software for
example in um JavaScript and node that's your promoting ecosystem you're obviously going to be happy on a computer that can run those things and something that they only do and see for example and the other way they use is CNC plus and but there are some important differences so for example microcontroller boards typically have um richer low-level IL options so we've used an analog input in there there's no such thing as Raspberry Pi yeah and and they're often simpler to get really because all they run is the single program that you put on it you know the program you purchase the ROM on the controller when you press play on your Arduino IDE or similar it's only got
that to worry about and single broad computers can do more you know they're really limited to put whatever Services you want on here including your favorites of machine learning libraries or whatever and and they can run a full OS with all the benefits that that will give you like you know network connectivity and all that sort of stuff and but they come with drawbacks you know one being fewer options for Io another being that actually you're not you've not got quite as much control over the real-time aspects of the i o you know if you need something to happen within a few milliseconds well actually I'm sorry you've got to wait for the Linux kernel to schedule that way and
and so um I sometimes use one I sometimes use the other and very often I'll use both and this is where we're going to sort of go with the the analog and serial example in the moment and that is that and if you've got different devices in Your Arsenal you can make use of the benefits of them um in the ways that you want to without having to be constrained so um the first robot we saw we had that little um green 3D printed thing and it had an Arduino in the base yeah doing all of the Iota Motors intensity where the motor encoders were and it had a phone on a stick which provided
um virtual telepresence robots stuff uh virtual telepresence and software so it had a a version of Firefox that I'd happen to allow to talk to Bluetooth on the um Arduino and it used webrtc to allow me to um control it from the remote browser right so so you can make use of both of them you can't run Firefox in the microcontroller and either as you want to but you can run it on a phone and you can't run um uh your favorite dev tools on a microcontroller but you can probably run them on a Raspberry Pi so and being able to use both can be really really useful and with that in mind let's get back to the example so what
we've got here we've got this analog i o program uses exactly the same Hardware but it's making use of the cable between the computer and the Arduino to give us access to a Serial console so we're going to run this program now and then what we're going to do is we're going to get an uh called a Serial monitor and let's go on to the second wallet you could of course it has okay and we're going to tell it to show us of course it's not working there we go it's showing us what the value it's reading from the analog input is okay so if I turn that potentiometer and tell it to show me again
there we go it's going up and it should go all the way back to 1023 there we go and then what we can do is we can make it change the behavior at runtime Okay so we've got our camera here if I'm going to move this over to one side and at the moment if I go from all the way clockwise to all the anti-clockwise it takes you from being all the way onto all the way off and if I tell the if I tell the program to reverse the input now when I go all the way clockwise and go all the way anti-clockwise it makes the brightness go up so to reverse the effect of the
input right and so this this starts to give you the idea that you can take these systems which in their basic form are actually really really simple and by using software you can make them do different things it's essentially a configurable thing that you just made yeah um so for example your um incubator might just use a Raspberry Pi because it um you need to be able to run a program it needs to be able to do digital i o but it doesn't need to do anything fancy but being able to talk to it from the house is really useful yeah your your phone on a stick robot you use the phone for the brains use the
microcontroller to control the hardware you're working together it's really really useful okay have I explained all that okay brilliant fantastic so then actually before we talk about this have you seen this before yeah right so apologies for the next bit because we're going to go a little bit draw the rest of the out um but but before we do I just want to introduce a thing Okay so we've used a couple of different types of we've talked about a couple of different types we've used an LED it goes from sort of completely off to completely on and you've got the fits in between and you can do that with motors as well right okay and but sometimes with motors you
don't just want them to sort of off to fully on and something in between sometimes you want them to go the other way as well right and how do you reverse the direction remote only one name brilliant okay so that there is an acreage driver it's a thing that allows you to not only turn the motor on and off and in between it also allows you to to swap over the uh the power so it goes the other way essentially in simple terms and it what it does it gives you two motor outputs you've got motor a motor B uh it gives you four input pins and um the way I've configured this one you
give that input on this pin and it'll make the motor go one way you put on that pill it'll make that motor go the other way and conveniently this board is in h.298 board that you can get on eBay for about 1.50 I think and will also allow you to take a 12 volt input and it will give you a sort of vaguely stabilized five foot output for five volt output which allows you to power your your microcontroller or a little computer okay and so what we're going to do is we're going to gonna take that and um use that to make a slightly more complicated version of what you see okay so there are four
digital outputs here at nine six five and three those go to those four pins that control the motor one way or the other on each side and then we've got another thing here did anyone guess what this is sorry it's it is a it is a Wi-Fi or Bluetooth card specifically it's a Bluetooth card and it's one of these again you can get them for a couple of pounds on eBay and what it does is it gives you a um device that you can plug into a Serial port and then you can connect to it from a Bluetooth device or your phone and then you can send data similar to what we're doing over the serial monitor there but
over Bluetooth right so we can take what we've already learned from the serial example apply it to four pins instead of one LED and instead of physically connecting USB cable to the computer you can connect this instead and talk to the microcontroller over Bluetooth so it's exactly what we've seen it's just more of it right now this is the bit where it's all going to go horribly wrong because I've got to put that together now while we're here okay so what's your level of confidence yeah you've got faith in me this is lovely good track record so far oh yes only so far so far so good you want me to do before we do anything else though is I'm
going to put the correct program on the microcontroller because we're gonna um really we're going to unplug it from the computer and hopefully um once the power comes from the battery pack I've got everything's gonna work okay so just to show that I'm not cheating here we have an Arduino project code bot software and those four output pins lslr rfrr left front left rear right front right rear for those four um motor pins that those four motor pins there yeah and and then uh I set up the serial for the Bluetooth connection tell the output pins to the output pins and I Loop over and I'm listening to um the Bluetooth input for some strings
and uh I decode the line and then I tell it to move the motors okay and if if you want to read more details just like that feel free to people finally afterwards and I'm not going to read C code now because that's even less interesting than me talking okay so that's what we're going to try and do now um did I press go on that object but then I did let's do that Okay so it's done that wish me luck okay now so what I did here and obviously with the um the example I showed you before this this is something that me and my kid built right and it was a phone on a
stick thing who who 3D print stuff and robot Parts here fantastic brilliant the two of us in this room to do that right so it's not very accessible as a way of doing stuff so I thought how can I make a little bit more um accessible so the next thing I did was I went on Amazon looking for robot chassis or toy chassis and I found this right so this is a I think it cost me four pounds it's um a little plastic thing with two Motors and it had a little battery pack and just slightly together with the motors and I thought well that could be interesting but the motors were rubbish so I took some Motors out and put some
better ones on Chopped out the battery pack because it wasn't powerful enough and and then realized that actually you know what um we're in building your own stuff territory again and that's not really what I wanted um this is we've got what we're talking about we've got our h-bridge driver here underneath we've got a couple of Motors here and so when we plug all this in we've got exactly what we saw on that diagram a moment ago so we're going to plug unplug this from the laptop I'm going to start plugging this in so the first thing I need my Bluetooth adapter thing here needs some power so let's let's connect that at first and I need the red one to go onto
three what three and a half volts under the ground to go into the ground so hopefully Bluetooth has power now I need the Bluetooth serial lines and what I've done here I took a photo of how it's supposed to look so I can put it together without thinking because thinking is a thing that's again harder when there's a room with people watching you and and these are supposed to go on pin 10 little 11 here because that's how I've set up software serial in the Arduino project okay now what I need to do is I need to power the Arduino so I've got two power Leads Here the red one goes on five volts the not black but it's the closest to
Black I could find goes on ground okay so the Arduino should have power now now what I need to do is I need to connect up those four motor control leads and those go on you're gonna go tell everyone that the most dull talk in the world who is telling me what colors he was plugging in red
yeah yeah oh there it is
[Music] Brown yellow and blue so red goes in three Brown goes in five so these PIN numbers these are um pwm output pins on the Arduino they're not just sort of random numbers for fun um yellow goes in six a blue goes in nine and then because I've done the rolls power earlier I need to fix that nine and then once we've done this and and this again is I apologize a slight uh draw the rest of the L moment I wrote a program for my phone that talks to this over Bluetooth and I'm happy to share that program with anyone that wants to play with this sort of thing in their own time and again I
didn't think you'd want me to Live code that while you were all watching um there we go so now this is all connected up except the five volt here keeps on falling out it's going to do that again I know it is on a piece of that um and now I just need to add another battery because that's how I turn this on and there are blinking lights blinking the lights are good side right okay lights are blinking I'm gonna tuck a couple of leads in so that it doesn't pull itself apart as soon as we try and make it move because that's a very real risk here it's also entertaining so I'm not going
to try too hard and then I'm going to put it on the floor there we go so I wrote a program on my phone what it does it gives you a little um UI that tells you that you can connect to the Bluetooth thing if you want to and then if you touch in the middle of the screen it does nothing if you move your finger up in the middle it drives the motors forward person is wrong with that if you now I've I've said the things that I'm around it still kind of works so look but there you go I'm controlling this with my phone and that was a tiny little program on the microcontroller
and a couple of little bits of hardware and oh we've made a little radio controlled Choice Isn't that cool so there we go [Applause] there we go so like total cost of that um including the microcontroller is like less than 20 quids and if you use the newer cheaper microcontrollers like that little must be paid board you're probably looking at um less than a tenor actually um okay so um the very very final bit that's still not very accessible because you've got to buy a thing and cut it up so I thought how did I make this even more um accessible see what I'm doing here so Lego make a series of toys called Power functions
and so what I did was I bought one of those kits and I figured out how the wiring works got these little plugs uh these two here are always round and five volts and the other two switch over depending on what the power purchase Kit's supposed to be doing and then electronically it is identical to what we've just built so it's got the same h-bridge driver it's got the same microcontroller it's got the same Bluetooth thing and so if I turn this on
get my phone out
yes I'd like to connect please
oh there we go there we go so you know that's just how to build robots the complete videos thank you very much
foreign
they still enjoy it even when they don't understand what's going on so like my daughter is uh just turned out and she enjoys playing with them my son was probably 11 12 before he sort of really understood what was going on and and you know you can the right bits of hyper and stuff now so you've been playing with things like micro piping on the Raspberry Pi 2014 and yeah they get different things out of it at different ages
and probably the chicken food one actually yeah that's fair the reason for that is then it's actually useful I made it because I had an unfortunate incident where I forgot to show the chickens in one day the fox got them and so knowing that um that once they go in the door closes is little um RS chicken like bird rings on their feet so I know when they're all in that's so cool and so when it gets dark if the door closes and then I'll order I know to go out and check everything so that's probably one of the most piece of it yes
do the chickens have names and if so what are they um yes they do um so we have birds that used to have a friend called Woody that sadly is no longer with us we have Elena because my daughter's favorite TV program for a while was Elena of avalor we have um uh Barrel um which was taken in by a neighbor who found a chicken wandering at random down the road no idea where that came from um and we have one that's called Purple because the ring is purple um which I missed out yeah so yeah we used to have 12 at one point including a couple called Kevin he was a bit scary thank you very much
Related talks
 27:50
27:50 51:46
51:46 59:08
59:08 38:42
38:42 22:23
22:23 27:06
27:06