Making of the BSides SF Astronaut Badge
Show transcript [en]
all right hello everyone thank you for coming out for b-sides this is our first year of villages talks uh of hopefully many more I'm presenting today abhinav who will be talking about all of the logistics and uh techniques and his trial and error of making the astronauts badge um abhinav is the founder of hackerware this is his second year with us as a hardware Village in badge Village representative I will now go ahead and hand it over to abhinav thank you for kicking it off for us
yeah thank you Aaron and good morning to all of you uh so I'm here my name is abhinav I'm here to tell a story about how we made the astronaut badge if you guys haven't seen it we have it in the bash Village uh so little bit about me I combine electronic art with Hardware hacking and I make badges uh for conferences around the world so we have been um present across not 12. I really lost account I think it's 12 countries so far and lots of big conferences in like Defcon and HTTP and code blue root con and uh all sorts of events um after this conference I will also be at the RSA we have made the RSA badge as
well so if you guys are on maybe you want to say hi there uh so there's a lot of people ask me how I just got into this thing uh so when I was in college I really didn't like the the way college did things like I I found it like creativity and all so I got frustrated and then one day I just went like I'm gonna drop out of college and that's what I did and back then one of the Indian conference they wanted to make badges but they absolutely uh didn't have any uh way or means to make it happen because it's just so complicated to do things and manufacturers not want to talk to you they're gonna throw lots
of stuff at you and they'll bring up funded issues with you know why they design they can't do the design or if they can do the design they have certain issues and all so that's how I got started we made I made badges for an Indian conference first and then eventually uh I made badges for Defcon China there was a village in Defcon China and that's how it started rolling and I began expanding to more and more countries and more and more conferences so this is my second year at besides SF I'm really thankful to the crew for having me back and last year we had a phenomenal rubber ducky Village you know we made this inspired by the California
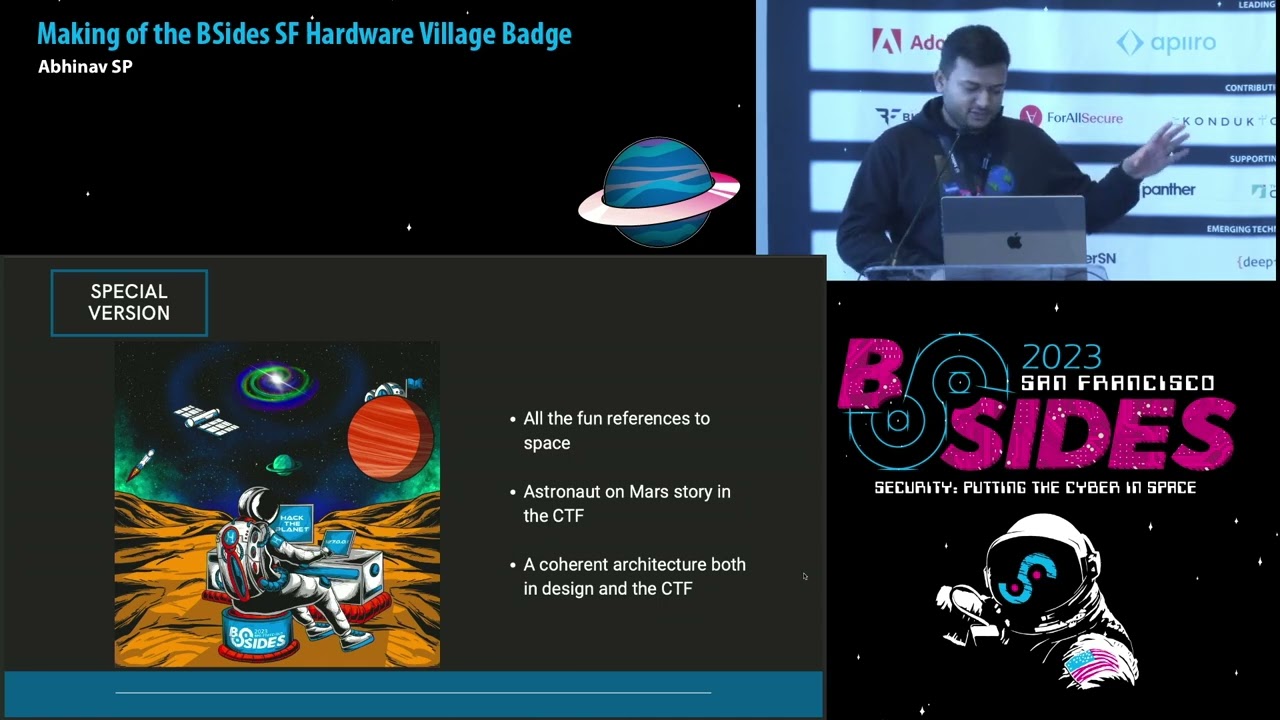
and uh I forgot the trees name yeah so so it was in like a tree design rubber ducky badge last year uh so when I started thinking about making the badges for this year the the natural instinct is what's the theme and the theme was putting cyber in the space and I was really glad because I was I am a space Enthusiast myself so I was super excited uh that they would choose this name and um again we didn't want to do just a blinky batch because uh it's just a blinky batch and we wanted to bring something more to it um maybe put some CTF in it and have some learning done through it and
um the idea was we'll put some space facts and space trivia and all in the city also if you play the CTF you will come across uh challenges like James Webb and it will make you go through some of the NASA resources and things like that so it's it's fun for even for people who are not good at Hardware hacking it's still fun to do this of nonetheless and this was sort of an initial design um with lot of just a black PCB and a Cosmic Landscape with you know white silk screen and we had a bunch of uh I wanted to do a bunch of reverse mod LEDs uh to Glow the planets and all and of
course the USB port of on it uh but what happened is essentially uh so we have done Fair number of the PCB badges before like uh if I were to go to my website it has lot of the previous uh badges that we did and a lot of times we manage this if you see this batch we managed uh the shades by basically we print the white shade and then we print the red and then we print the black and then we print the red so you get a lighter red and then you get a darker red and stuff like that um and that's what how we try to maximize the design in that way
um by just layering the color the ink layers on top of one another and the thing was because over the six years of time we built our in-house lab so we have our own machines to do everything now so we had the freedom and um uh we had the freedom and time to do all sorts of these things and pay lot of attention to detail but yeah it still was lot of tedious process to go through each design is customized then each design is you have to work through it and all and so I started wondering uh what do I do if I want to go beyond it I just I just don't wanna uh just do the shades
like you know darker or red and um and then so one of my friend he was in a trade show and he overheard that uh he was seeing a machine like a Euro printing machine and he overheard it can print on any surface and then it kind of ignited the bulb I'm not here it was like okay if it can print on any surface can it print on the pcbs and so we started doing the test uh so I already had the artwork uh we made this t-shirt sign hoodies uh before like the one I'm wearing right now um in a moon and mass version you know it just hacked the planet theme and I I
really like the artwork so uh so we made like a a customized version of it and which shows this thing so we just uh put some elements on it for the CTF so we have the rockets and ISS and then Supernova colonized planet and all and the whole idea was Will you will write a CTF that essentially gives you a feeling of us or running a space mission so solving the first challenge glows the rocket and then the second one it will put you on the ISS and there it has challenges to do with James Webb and you know all sort of stuff uh so this was the design and um the astronaut and the Mars kind of
theme and both the CTF and the design had to go hand in hand with this theme um so he started doing some early testing um we always been focused on making PCB single-sided that the reason was I really like just having a clean PCB look on the front side um and then the components and everything on the back side so uh this was like one of the early stage testing we did with the colors and all and it was having this matte finish by default and in in the UV printing there's a technique called lacquer coating and if you do the lacquer coating it has the glossy finish on it um and this was the first prototype we
built and it had quite a few issues with it uh mainly the issue was uh there was very inconsistent white print uh in UV Printing and of course one of the issue that I later on got to know was the most common with u printing on PCB was that it turns yellowish so one of the process in assembly what you do is you for the soldering you put the board through a very high intensity kind of a thing and the UV printing reacts to it in a in a way that it turns the color yellowish and so on and that was one of the key issue we were trying to solve and again there was this inconsistent print area
it was shifting a lot from what we wanted uh and these were just bunch of early issues we had with it uh and the way we solve it is first and foremost we um we we bought out the techniques from both the old PCB making and then also the new ones that we were doing and essentially what we did is we masked the PCB so on the back side we had the black masking and in the front side we had the white masking and on top of the white masking we would go on to print the UV printing on it so as a result what happens is we fixed that white tissue which was the
inconsistent white print that's how we could fix it um and then the second one was we we could put a reference point when we were assembling so let's also face the shift issue which is like the artwork not matching the PCB size and then finally uh for the LEDs we just put it open on both the masking so as a result we have the LED is glowing from the back side uh if you can check it here the LED is broken from the back side but then the glow also comes out on the front side um and yeah that that fixed uh half the issues and those with especially with the color correction and all uh and then
the second one the the yellow strain tissue which is extremely common with people trying to do sort of this stuff uh and most um people I talk to they really couldn't fix it uh but we were able to fix it and the the way we were able to do it is so in the in the Reflow oven which is the process for soldering the components um and the Machine you can do this profile and it's basically how much is the conveyors paid how much is the wind speed and the temperature and everything uh uh we did so many experiments and then had so many fails um so the the problem is if you put the
temperature too high the boat turns yellow is for sure and then if the temperature is too low then it's not gonna solo properly so we just kept experimenting and experimenting and then trying to find this sweet spot where the components are soldered but at the same time there's no allotted issues happening and eventually we are able to uh find that sweet spot and we were like yeah we found the profile and then we made like two copies of it just to be on safe side um and noted it down you know history books and so on uh so and once we did that so uh we UV printed the artwork so we black masked on back
side and then white mask on the front side and then UV print the entire Auto conference side and then you put it through the Reflow one and solder it and oops Yeah and I'm going to go ahead and focus do not disturb yeah and so yeah so the take on the PCB now which is uh we have uh moved away from so some of the previous data badges they featured achieved from a company called a both we have moved away from them now um and we have started using note on part of the reason is we wanted to have some proper support from those companies and note on was the one they were like we'll
send you engineer to your site and he will install a software and he'll be there what do you need it from us and you know just use our chips and you're like okay fine I will give you a chance and yeah it turns out I'm glad it turned out very well um they have good support and [Music] um architecture and we put the micro USB for a very quick interfacing so even if you don't solve the challenges here you can just go home and you just need a micro USB cable and you should be able to connect your system and then you should be able to play the CTF there are pads for uh reprogramming if you want to dive into
that rabbit hole um and then data and maybe your Hardware hacking pleasure and then we have a customer server header as well uh we did it again because I didn't want to drill any holes on the board so we it's a very custom SEO design it's not the conventional one you will see in batch life and of course all of it is powered by the coin sale because that's easiest thing and most suitable um so yeah this was pretty much the tech and there's a switch for you to turn it off before connecting the badge and yeah that's pretty much it so we soldered the LEDs upside down once again these are just the standard LEDs
um so and this was the final form when everything was done so this is how it looks when all the challenges are solved um it doesn't show the essay although but you can get this if you solve the challenges here and just show the badge that you have sold all changes will give you the SEO it's like an alien abduction yourself um and this is how it looks when all of it is done and ready so now designing the SEO so which is uh again as I said you didn't want to drill the holes on the board so they it had to be an like SMD mounted and we did Fair number of experimentation with it we tried to
try to see how we can mount it without going the conventional way and it's just it's just a single LED that's glowing this abduction effect uh if you call if you want to call it um and the initial one yeah and that was the idea but uh so if you use the pth LED it's going to not mourn properly it was mounting like uh diagonal sort of almost and then we tried with the SMD LED but it wasn't having the full glow it was just like a pinpoint glow and but that fixed like just the same uh so how do you fix it we basically extended the leads and then um put a really nice urge ability on it so
it has this really cool alien abduction effect um so yeah but you know stuff like this uh we always try to see what new things we can do or not what Innovative things we can do a lot of time it's you can argue it's tacky and I would agree it is a little tacky but um the whole point is how we can push the boundaries of patch life and try to do unique things and try to try to experiment with what works and what doesn't work and thankfully everything works in this batch so hopefully next one also was just the same uh uh so yeah so the best city of Seoul um is built on the
serial monitor setup that we have always used so you can use any serial monitor you like you can use the terminal you need to know the right tools to connect the batch but if you don't you just want to get started with it as a newbie you can download Arduino which is the open source ID to code these chips and in the Arduino you can just select the right port and that gets you started it's it's like it takes like two minutes to get started and that's what we essentially want you're gonna make more and more people to participate and more and more make it accessible for majority of people to get into it if not everyone
to get into it you just need to have interest to do things um so the city of uh again it's uh it's not too technical on purpose it's just um how to explain it it's more like a puzzle uh so you just need to think bit creative so it's it has crypto puzzles then it has ocean time it has techno puzzles on it uh again nothing too difficult to solve if you just if you know how to Google things it should be fairly simple uh again turn off the badge before you connect the USB because you don't want to risk it uh and again it won't work the CTF by Design so you need to you
know turn off the batch before connection so uh yeah and as usual we have the three star thing you open the serial monitors in three stars and the badge goes into this CTF mode and on the CTF mode uh it prints out this so we build lot of ASCII art as well in it so uh maybe any fans of you know 80s terminal era uh you guys really gonna appreciate the asciard so it's built in that and there's a lot of um design and like rockets and ISS done in SKR for each challenge has asked uh so uh yeah and if you solve as I said if you saw all the challenges you get the
SEO the alien abduction SEO and uh and the fun part is to reset the badge you have to send the command black hole that's it so you just type the black hole and send it and that resets it and you just connect the batch again and of course it's me from the last having my lunch because I didn't get time uh but yeah so we have the badge Village to uh encourage the CTF and the programming aspect of it uh try to get people into some of the crypto challenges and you know taking the challenges in it uh we have plenty of laptops to for you to try on then we of course we want to hand out the seos you
will also get the badge there we have I think 250 Something badges to hand out without any cost so just only have to have interest and that should be done and yeah let's celebrate the bash life and put cyber in space uh so if you need any CTF or support or anything you it's right on this link uh and then there is a slack challenge if you just slack channel on the research SF and there's this bad CTF channel so you can just go ahead and ask us queries there we'll be here for entire two days so if you have any issues for two days I'll be here and if not you can text me on I don't know
Twitter or any any way you want you can text and that should be fine and this is the website so on the website as well there is a contact form and email and everything so uh yeah that should be it I think thanks a lot for coming to the talk it's my first talk in U.S and I hope you liked it so if you have any questions we'll take questions for five minutes if not then I will be just around the badge Village yeah anyway anybody okay
I was just wondering what is what was the cost of the badge run about how much is it per unit uh cost of the bedroom yeah um cost per unit and kind of total just curious um yeah I think we probably had some run 25 or something with the badger and yeah and that's again because this was the first time one of the thing is as I said uh when I first time when I saw the uh the UV printing uh samples I was so sold out we went ahead and purchased the UA printing machine so we imported it and that was I don't know fifteen thousand dollars for the machine but I was very
glad because we could now do the full color pcbs and the the rest of the badges we are doing this year all of them are probably going to be full color as well uh so yeah there you go yeah that should be any other question yeah I think we are yeah I think we are done here uh thanks a lot and I hope I will see you in the badge Village uh yeah have a great day everyone
Related talks
 28:29
28:29 29:24
29:24 32:13
32:13 30:17
30:17 38:53
38:53 32:39
32:39